Time Lapse of a Studio Landscape

Here is a short, two minute, time lapse video of a large studio landscape I painted over the last couple of weeks. After buying a ton of winter gear for plein air snowscapes we’ve had a really warm, snow-free winter, and I’ve had colds and flu for two months and been stuck inside the whole time. On the bright side, I did manage to get a lot of studio work finished.

This painting was enlarged from a plein air sketch I originally did on Diaz Beach at the Cape of Good Hope in South Africa two years ago. I also did a number of drawings to design the composition and I had photographs that I used for information in the areas which my sketch didn’t cover. Even though I had thought out the composition that I wanted with drawings, as you can see in the video I often make changes after I get started as it is easier to see what works and what doesn’t on the large canvas.

I’ve added some annotations in the video to explain some of my decisions while working and I explain some compositional rules. I feel it’s important to reiterate that, while I believe it’s important to understand rules in painting, often the paintings that we remember -the ones that really stay with us for a long time- are precisely the ones which break those rules.

That said, the compositional error of having major elements all the same size is something I do feel hurts a lot of paintings, some of mine included. It is something artists should be aware of.

Landscape painting in oils of Diaz Beach at the Cape of Good Hope in South Africa by Marc Dalessio

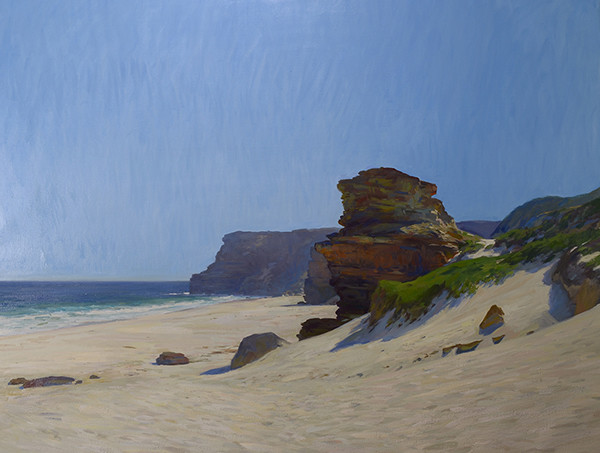
Diaz Beach, the Cape of Good Hope. 120 x 150 cm, oil on linen.

Odds and Ends

Plein air painting of fallen tree stumps on Sljeme above Zagreb, Croatia.

Fallen Trees, Sljeme. 20 x 30 cm, oil on panel.

Here are a few plein air landscape paintings from the last couple of autumns and winters. I often paint small plein air sketches that don’t end up being part of a large enough group to merit a blog post, so I figured I’d put them all in this one. Most are from around Zagreb, but a few are from recent trips to Bordeaux and London.

Plein air painting of Mirogoj cemetery in Zagreb.

Mirogoj. 20 x 30 cm, oil on panel.

Plein air nocturne of a nativity play in Zagreb, Croatia.

Nativity Play, Zagreb. 20 x 30 cm, oil on panel.

Some of these are unfinished, including the two below where I was driven away by the pouring rain in Bordeaux.

Plein air painting of the horses on the Monument aux Girondins in Bordeaux.

Horses on the Monument aux Girondins. 20 x 30 cm, oil on panel.

Plein air painting of the Porte Saint-Éloy in Bordeaux.

Porte Saint-Éloy, Bordeaux. 20 x 30 cm, oil on panel.

Plein air landscape painting of a sunset in Bordeaux, France.

Bordeaux Sunset. 17 x 30 cm, oil on panel.

Plein air painting of the White Garden in the Rookery in Streatham.

White Garden, The Rookery, Streatham. 20 x 30 cm, oil on panel.

Plein air painting of the pagoda in Battersea Park, London.

Battersea Park Pagoda. 30 x 20 cm, oil on panel.

Plein air painting of a Calzedonia advertisement in the rain in Zagreb.

Billboard in the Rain, Zagreb. 30 x 20 cm, oil on panel.

The above ‘Billboard painting’ was an homage to Telemaco Signorini’s painting of Leith in the Modern Gallery of the Pitti Palace. It’s always been one of my favorite paintings by him.

Plein air painting of the park near Zvijezda, Zagreb.

The Park at Zvijezda. 25 x 35 cm, oil on panel.

Plein air painting of Sunday coffee in Samobor, Croatia.

Sunday Coffee in Samobor. 25 x 35 cm, oil on panel.

Plein air painting of the road into Samobor, Croatia.

The Road into Samobor. 25 x 28 cm, oil on panel.

Winter Gear for Plein Air Painting Part II

Winter clothes for plein air landscape painting.

My 2016 winter kit.

“There’s no such thing as bad weather, only unsuitable clothing.”

― A. Wainwright

Last year I wrote about the problems I was having painting outside in the Austrian Alps in February due to inadequate winter gear. This post is about some of the solutions I found after researching and purchasing kit this year. The listed price on some of this stuff is pretty high but buying in spring and summer, using sites like Steep and Cheap or Ebay, and finding an online store that I’m pretty sure had listed the wrong prices (they’ve since fixed them) allowed me to pick up most items for a fraction of the normal cost. And some items are just well worth the money.

My goal getting this kit was to be able to work outside all year without feeling any discomfort, despite the fact that I get cold really easily. I’m really happy with my current setup. It also breaths well so I can trudge around in the snow looking for my view without getting too hot. Furthermore, merino and down both regulate temperature rather than just insulating so I find I don’t have to change in and out of layers as the sun and/or wind comes and goes.

  • The Belay Jacket. A belay jacket is used by alpinists when they have to stop and wait around while climbing mountains. The advantages for plein air painters are threefold. First, the design of the sleeves is to allow for unrestricted movement while climbing (called articulated sleeves). This means that when painting you wont fight your sleeve. The second plus is that they are incredibly lightweight as they are usually stuffed into a stuff-sack and carried up the mountain. They use high-loft down or modern synthetic insulation (you can read about down and synthetic down jackets here) and this, combined with the articulated sleeves, means you really can’t feel the jacket at all when you’re holding your arm up. A normal winter jacket or parka will often have a noticeable pull. The real-world result is that I haven’t had my usual sore shoulder for a few days when I switched to a jacket this year. It’s not that big of a deal, but it is something to consider for anyone looking to pick up a dedicated winter plein air coat. The third thing about belay jackets is that they are very warm so you don’t need many layers to stay warm (though most decent winter jackets do fine here). Mountain Hardware, Rab, Arcteryx, Patagonia, and other mountaineering-gear companies all make belay jackets or parkas. For cottage companies, PHD (England), and Feathered Friends, Montbell (Japan), and Nunatak in the US are also making belay and expedition jackets and parkas. There are both down and synthetic versions. I went with down for the weight to warmth ratio. The synthetic ones will keep you warm even if they get wet, which seems to me to be more of an issue if your life depends on it high up on a mountain. 

    Update for 2020: I’ve switched to a waterproof Crux Magma and it’s much better. The problem with many belay jackets is they’re design for use with a shell in rain or snow, but for a painter you lose too much dexterity with two layers. The Crux has great mobility in the shoulders and is incredibly light and warm. And it’s completely waterproof, so you don’t have to worry about staying out too long in precipitation.

  • Mid-layer Sweaters. I bought a couple of ‘technical’ merino sweaters of different fabric weights that I switch depending on the temperature. They’re not stiff like some of the heavy sweaters I wore in the past to make up for my jackets never being warm enough. My favorite is a Bergans of Norway merino wool sweater that was reasonably priced and has a half-zipper to regulate the temperature better. It also comes with thumb-holes in case I ever need to do whatever it is you need thumb-holes for.

    Update for 2020: Yak Wool sweaters from Khunu are much warmer for their weight than merino. Unfortunately they sell out quickly. I will wear a fleece over the sweater when it’s really cold.

  • Merino Base Layers. I had a hard time finding expedition weight pure merino base layers in stores in continental Europe. As I mentioned last time, synthetic base layers are more designed for very active use, where wicking away sweat is important. For standing still the best thing I’ve found is a heavy weight merino base layer. This year I’m using 260 weight (gsm) leggings from Icebreaker and a 340 weight Deep Winter Base Layer top from Rapha, an English cycling gear company. The Rapha base layer is pricey but if you consider it’s also a balaclava and neck gaiter, as well as being a very high-quality piece of kit, it’s pretty reasonable. I’m very happy with mine. It’s one of the only things I paid full retail price for and I feel it was well worth it. Minus33 makes heavier duty baselayers (400 gsm), but we can’t get their stuff over here. Woolpro is a cottage company making merino gear in the US. 

    Update for 2020: I’ve switched to yak wool baselayers from Kora and find them warmer than merino for the same weight.

Image showing the size difference between Harkila Inuit pac-boots and normal insulated winter boots.

Size difference between Harkila Inuit pac boots and normal winter boots.

  • Pac Boots. I’ve always gotten by with cheap hiking boots with hand warmers stuffed in the toes. Other painters use normal insulated winter boots with their car mats or a piece of foam under their feet as most of the cold comes from touching the freezing ground. I wanted something that I could work outside for hours in without carrying extra gear so I picked up a pair of real pac boots based on Stapleton Kearns‘ recommendation of The Cabelas Trans-Alaskan III Pac Boots. Since we don’t have Cabelas in Europe I bought the similar-looking Harkila Inuits for the around the same price. They’re comically large boots, and online images don’t really show how big they are. You can’t drive while wearing them, so for scouting with a car one still needs a smaller winter boot to use the pedals safely. Like all pac boots, they’re actually two boots in one as there is an inner wool insert that your foot goes into, then that goes into the larger boot. They also have two insoles below the insert and my feet are kept about 4 inches (10 cm) off the ground. Despite the large size, the boots are actually very light and manageable for walking as the insoles are foam and the sole of the boot appears to be hollow, perhaps to insulate better. The important part is that I can stand for hours on snow and ice in complete comfort.
  • Primaloft/Coreloft pants. A number of companies make insulated pants, again mainly for belaying mountaineers. The difference between these and insulated ski pants is that they lack the Goretex or other durable waterproofing. I bought a pair of Arcteryx’s Atom pants made from their proprietary Coreloft insulation and it really feels like some sort of futuristic fabric. When you move the pants feel slightly cool on your legs so you don’t get warm, but when you stand still they really insulate well. They don’t swish when you walk like ski-pants and they look pretty discrete for working in them in the city. They were also significantly cheaper in Europe than the US for some reason. I have a Gore-Tex shell for when it rains and a good thing about dividing the insulation and the shell is that I can tune the clothes for the temperature better. I also use the shell for rain in warmer weather.
  • Flannel-lined pants. I bought a couple of pairs of flannel-lined pants and can’t believe I’ve suffered through European winters for 25 years without them. Besides being incredibly warm, they’re so comfy. It’s like wearing pajamas all day. I live in these now. I have a pair of Pranas and Craghoppers, the Pranas are much nicer as the lining is pure cotton and doesn’t cling to your legs. The Craghoppers are warmer as the synthetic material use doesn’t breathe as well. The Pranas cost twice as much. That said, for painting outside in the snow, I prefer the Coreloft pants as the side zipper makes it easier to switch from car-friendly shoes to pac boots.
  • Primaloft hats. The hood on the Jottnar jacket is very warm but I prefer wearing a hat so I can keep my peripheral vision. Outdoor Research, Montane, and Millet all make radar-style hats out of Primaloft (probably other companies too). I have the Millet one and insulates well, is water-resistant, and still breaths. I also think I look very French in it, which is always a good thing when painting outside.
  • Gloves for the non-painting hand. Update for 2017: I’ve switched to bicycling gloves for the non-painting hand. Garneau, Pearl Izumi, Castelli, Rapha, ect… all make gloves for bicycling in winter and I find that they have better dexterity and grip than ski or alpinist gloves.

    Down Hibbard Mitten for plein air painting in extreme cold.

    Custom-made down Hibbard mitten from Luke’s Ultralight.

  • Custom-Made Down Hibbard Mitten. In the past I’ve used a wool scarf sewn into a thumbless-mitten-shape to keep my painting hand warm. The design is called a Hibbard mitten after Aldro Hibbard who painted a lot outside in the New England winters. (Update for 2018) I had one made by Goosefeet Gear, a custom down-gear maker. It works great. It’s very warm and weighs only half an ounce (15g) so you barely feel it on your hand. It also comes with a removable waterproof shell for snow and rain. I should mention that with any Hibbard mitten I don’t wear it the whole time. I prefer to keep my hand exposed to handle the brush better, when it gets cold I put the mitten on until it warms up enough to take it off again.

Recent Italian Studio Paintings

Here are a couple of larger studio landscapes done from smaller plein air studies done on site in central Tuscany in September. I realize I haven’t posted anything in a while as I’ve been working on these larger studio paintings and they take a long time. I have three more on the easel and I’ll try to update the post as I finish them.

Studio landscape painting of Castelmuzio, Tuscany by Marc Dalessio

Castelmuzio. 120 x 150 cm, oil on linen.

Oil painting of Scrofiano, Tuscany by Marc Dalessio

Scrofiano. 90 x 110 cm, oil on linen.

Update: Here are a couple more, I’ll keep posting them here as they come off the easel. Some are heading for the Grenning Gallery this summer, one is off to Constantine Lindsay in London.

Landscape painting of Castelmuzio in Tuscany by Marc Dalessio

Castelmuzio, Backlit. 90 x 110 cm, oil on linen.

Landscape painting of Giudecca in Winter in Venice, Italy by Marc Dalessio

Giudecca in Winter. 90 x 110 cm, oil on linen.

More on Color Calibration for Photographing Paintings

ICC Color Camera Calibration for photographing artwork.

The CoCa interface.

A quick post on calibrating color for photographing paintings. I wrote a longer post in 2014 on photographing paintings with a DSLR using a Colorchecker Passport, Adobe DNG profiles and Adobe Lightroom. That system has worked well for me for the last couple of years, but recently I wanted to use Phase One’s Capture One Pro as I find it to be superior to Lightroom for my needs. The problem I previously had with Capture One was that it doesn’t use the DNG profiles that the Colorchecker Passport software creates.

The only solutions I had found for making ICC profiles were very expensive. The oft-recommended PictoColor InCamera is a ten-year-old plug-in that sells for $200. You then have to find a copy of Photoshop 5.0 to use it with as it’s still 32-bit. There are a couple of other solutions that cost even more.

Enter CoCa, the freeware ICC Color Camera Calibrator. The software works with a number of physical color reference cards. One inexpensive one that I picked up ($30 plus shipping) is the IT 8.7 Calibration Target from Wolf Faust at coloraid.de. It’s the C1 order number on his website (it says it’s for cameras, not scanners) and the package comes with the printed target as well as a CD with the reference files.

The IT 8.7 target from Coloraid.de.

The IT 8.7 target from Coloraid.de.

The CoCa webpage has instructions for the software but to sum it up briefly: You first photograph the calibration target under your lighting set-up, then crop it and save it as a TIFF file in your camera’s software. Next, select the image in CoCa, then select the target type and the reference file from the Coloraid CD (R131007.txt). Finally, save the ICC profile in the proper folder so your software can use it (for Capture One it is explained here). You can then apply it to your paintings in whatever software you’re using. For Capture One it gets applied via the Base Characteristics box under the Color tab.

CoCa should work with the Colorchecker Passport too, though I haven’t tried it.

For those using OSX, you can run CoCa through Wine though the process is somewhat complex and requires that you’re either handy with command line interface of Terminal or, like me, reasonably good at following instructions and copying and pasting.

A few people I’ve discussed color calibration with have balked about the high prices for calibration gear. In my opinion, this works out to be a good solution for a bit of time and $35 ($40 in the US).

Below are a couple of images of a painting of mine for comparison:

Photographing artwork with Coca and a coloraid.de IT 8.7 calibration target.

CoCa with a Coloraid IT 8.7 target and Capture One Pro.

Image of a plein air landscape photographed with a Colorchecker passport calibration card.

Colorchecker Passport with Adobe DNG and Lightroom.