Update for 2021: I have a new (short) post, and a video with my updated thoughts on how to photograph artwork with a DSLR.
This is the previous post:
When I wrote about photographing paintings last time, I discussed hiring professionals and the equipment they use. In the years since that post, digital camera technology has developed a great deal and in a direction which works well for photographing paintings.
What an artist needs in a photograph of their work are the correct colors, values, and chroma of the piece, with a distortion-free lens, in a very high resolution which can show the detail in the brushwork, as well as the varying sharpness and softness of the edges. For years the best way to do this was with a medium format camera with a digital back. The price for this equipment could run easily into tens of thousands of dollars. The major recent change in consumer digital photography is that the camera companies have engaged in what technology writers derogatorily refer to as the ‘megapixel war’. This race for better sensors with higher pixel counts has pushed the capabilities of DSLR sensors into the range of the low-end digital backs, potentially saving the DIY painter a ton of money.
Obviously, hiring a professional photographer will achieve better results. They will have better equipment and the experience to know how to use it. They are also incredibly expensive (in Italy I paid €100 per photo, or about €1000 for an hour’s work). You can buy a whole set up for the price, and since photographing paintings is really a one-trick pony, getting it good enough isn’t that difficult.
To photograph artwork well one needs the following equipment: A tripod, proper lighting covered by polarized film, a color calibration system and gray card, a decent DSLR body which can be tethered to a computer, a computer with tethering software, a good macro (micro) lens with a circular polarizing filter, and software to edit and archive the work.
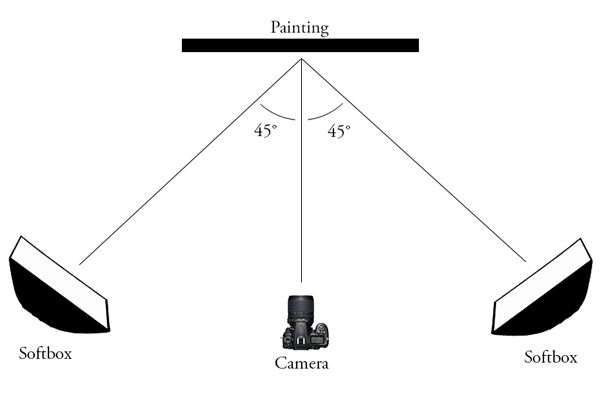
First place the painting on an easel with two bright, full-spectrum, lighting sources at 45 degree angles to the artwork, put the camera on a tripod so the lens is parallel to the surface of the painting, as shown below. Lights, painting and camera should be at the same height. There should be no other light sources, and anything white that can cause a glare on the painting should be covered. Professional studio photographers recommend not using the camera’s auto white balance, so I first set my white balance in the camera to 5400K (which is similar to the color temperature of the light given off by my bulbs). I then made a preset in the camera, photographed a group of paintings over and over, and tweaked the color and contrast settings until my painting looked somewhat correct when the image first comes out of the camera.
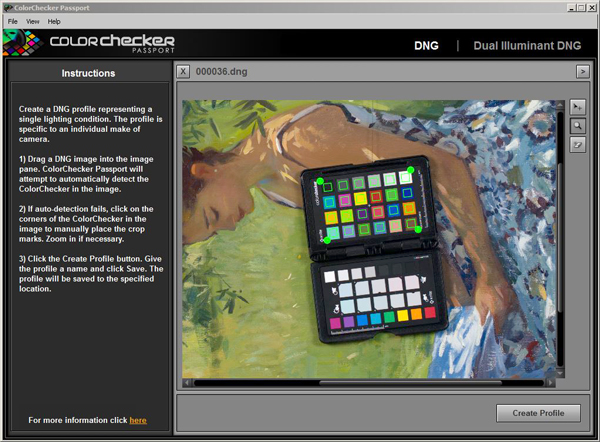
Put your calibration card in front of the painting, photograph it, then run it through the included software (if needed convert RAW to DNG with Adobe’s free DNG converter). The software finds the color squares, measures them and makes a preset for your camera. Save the preset. Remove the calibration card and put a gray card next to the painting.
Photograph the painting by first putting the camera in mirror-up mode (or set the remote connection to use mirror-up mode). Set ISO to the lowest number, usually 100, and operational mode should be aperture priority or manual (program mode will work too if you can change the aperture setting). Set image type to RAW. Set the lens to manual focus mode. Turn the polarizer on the lens until the glare on the painting is gone.
Next turn on live-view monitoring in the tethering software on your computer, put the tethered image in full-screen mode, zoom in to the maximum and manually focus the shot by hand. If your tethering software can take the photo in mirror-up mode, shoot from the computer screen, otherwise use a shutter-release cable or remote. Do not use the shutter-release button on the camera as it can move slightly and blur the shot. Experiment with various f-stops to find the sharpest for your lens, normally with a macro lens the middle range from f/4 to f/11 will be best.
Import the photo into your editing software and apply the calibration preset (click the eyedropper on the grey card if the white balance is off). Make any other corrections, i.e. rotation, crop, lens profile adjustment, etc… I then tag the paintings with the year, location and subject, so I can find them easily later. I’ve also made export presets for all the possible uses I’ll have for the photos. It makes preparing images trivial.
Some tips for larger paintings: If you don’t have polarizing sheets, the lights can be at angles greater than 45 degrees to reduce glare. If there are problems with getting an even light across a large painting, find an area with even lighting and take multiple photographs, moving the painting on a flat plane at the same distance from the camera until you have photographs of sections of the whole painting. Then use stitching software such as Adobe Photoshop, PTGui or the free Microsoft ICE to put the individual images together. This method can also be used to get ultra-high resolution images of larger paintings while using a low-megapixel camera. With a bit of work you can capture an amount of detail which would give medium format cameras a run for their money. Subtle HDR is another idea if the value range is too great for the camera.
Below are some of my thoughts on photography equipment for painters. Much of the expense of photography equipment is to make sure photographers are able to capture fleeting moments. Since photographing paintings is done under very controlled circumstances, it isn’t necessary to buy the best and newest equipment. (I’ve added Amazon referral links).
- The tripod can be one of those cheap $20 plastic ones they sell everywhere. I have a couple that people have abandoned in my studio which I’ve used in a pinch. The problem is that they can be annoying to move into position. They are normally not recommended as they can wobble, but since photographing paintings should be done via a remote and with the camera in mirror-up mode there isn’t any movement. Still it’s better to have decent one like those made by Slik, or Dolica they run $50 to $100 (I use a Silk). Manfrotto
 or Vanguard are better brands and, while they can cost more, a tripod is something one should only buy once.
 - Proper lighting is inexpensive. I needed lighting to paint after dark in my studio anyways, so I picked up a soft-box lighting set-up with the following specifications: 125W (625w equivalent) Continuous Lighting, 5400K pure white daylight bulbs, General color rendering index Ra > 90. This is the one I have, to give an idea of what they look like. Professional photographers will use flashes which can produce stronger and better quality light, but you can’t paint from a flash. Finally, polarizing sheets should be placed over the soft-box, a cheap place to get polarized sheets is Polarization.com.
- As to which camera to buy, there are better websites to read than this one. Generally it’s considered a good idea to spend more on lenses and save on the camera body. The lenses last longer. I went with Nikon since they seem more interested in high pixel-count sensors while Canon seems more focused on their video capabilities. The recent Nikons have also removed the low-pass, antialiasing filter for sharper images (removing the low-pass filter can put the camera at risk for moire, but art-photographers I wrote to say it hasn’t been a problem). For a general idea, a new Nikon entry-level (DX) D3500 runs under $400 with a lens, it has a resolution of 24 megapixels and will take great photos. (You can sell the lens it comes with as you’ll need a macro lens). As you move up the line of Nikon’s offerings, the D5600 gets slightly better image quality for one third more the price. It also has a bunch of bells and whistles that don’t matter when photographing artwork in a controlled studio environment. The same goes for the D7500, which is weather sealed, takes photos faster, has better autofocus, gets better photos in low light, etc. Again, all things that don’t really matter for photographing paintings, but which should be considered if you plan on using the camera for other things. Buying a generation behind, used, or refurbished can save money. High-end professional Nikons with a full-sized (FX) sensor (such as the D850) are 36 megapixel cameras and are getting into the range of medium format pixel numbers, and you can find used D800s these days for less than a D7500.
- A macro (or micro) lens is normally for photographing small things up close. The reason they are used for photographing paintings is that they have flat field of focus with little geometric or color distortion. They are also generally very sharp lenses which can capture fine details. Painters need a prime macro lens with a fixed focal length, not a zoom. Since I have a small studio now I’m using an inexpensive 40mm micro lens for larger paintings, and a used macro 105mm AIS lens for my sketches. Most professionals seem to prefer an 85mm. The longer focal lengths tend to be better quality, and will have less geometric distortion, but you need more space to shoot larger paintings. A fast, f/1.2 or f/1.4 (expensive) lens isn’t necessary as the studio will be well-lit, and the sharpest aperture settings are in the middle (f/5.6 to f/11) range. Finally, because one should focus manually while photographing paintings, autofocus isn’t necessary and old used lens can have great (sharp) optics for less money. The circular polarizer should be from a reputable brand (mine is a B+WKaesemann Circular Polarizer).
- The color calibration system is one of the most powerful tools in art photography. I have the X-Rite ColorChecker Passport and it’s worth its weight in gold. What you do is set the color grid on the easel where your painting will be photographed, take a photo of the squares under the proper lighting, import it into your computer and run it through the X-Rite software. It will make a profile of how your camera sees colors under your lighting set-up. From there, any photograph you take can simply have the profile applied to it and it will get your colors and values correct with one click. I’ve spent hours trying to fiddle with settings with my painting next to the screen with much worse results. This is really worth the money. I also have a For photo archiving and correcting software I’m using Adobe Photoshop and Lightroom on a yearly subscription. It’s quick and powerful when you get the hang of it. The library works very well and I’m quickly able to navigate through my archive of thousands of photos. It has all the standard color correction tools, as well as spot-removal (often meaning bug-removal on plein air paintings). It also has my lens profiles from Nikon, so if I tell the program that’s what lens I used, it will fix the geometric distortion, quickly giving me straight lines on the edge of my paintings. To photograph from the computer I tether the camera with a USB cable and control it using the free Sofortbild program in OSX. If I’m using Windows, I use ControlMyNikon ($30).
- For monitor calibration, get a decent monitor (I have a Dell U2413 and a cheap 27″ Qnix from Ebay), and get a monitor calibration system. I have the X-Rite i1Display Pro which works with the Dell calibration software. It makes a big difference in viewing your paintings on the computer. TFTCentral.co.uk is great for monitor reviews.
Marc:
A fine article on copyshooting our work. One of the best I’ve read. However, one thing left out is the need to periodically calibrate one’s computer monitor as they will drift out of spec over time. It’s not required per se if an X-Rite Color Check profile is being used for the initial shot but it can be helpful if you want to view or edit the file afterwards. X-Rite offers several inexpensive options as does Spyder.
Again, a very good soup-to-nuts post on how to shoot a painting. Thank you.
I’m about to photograph a small acrylic painting for the first time. I have a Nikon D5300 with a 18-55mm lens and a Tamron 70-300mm zoom. Will the 18-55mm give good enough image to make prints?
Zoom in to reduce distortion from the lens. And if possible, profile the lens in your image-editing software.
Hi Suzanne and Marc,
I have been considering buying a Nikon D5300 primarily to photograph my oil paintings for a new website. Are you doing well with yours and could you tell me any other things that would make the job easier to accomplish?Which lens has been the best for you?
Thanks so much, Joanne
Thanks Thomas, I was actually re-adding that information at the same time you posted. Somehow it got cut.
I have a cannon D60 as of one year ago…. with 2 different lens, I take the photos outside against a neutral background on a bright overcast day, and also shoot in direct sunlight with location sunny keyed paintings… and get extremely accurate color representation. No other equipment is needed for my purposes. I find filters distort as well as indoor lighting.
Hi Enest.
Do you have a link to some of the photos you’ve taken with D60, in said conditions? I am curious!
Awesome article Marc! Amazingly in depth. I realize an iPhone isn’t cutting it for taking pictures of my paintings. Time to dust off the ol DSLR and drop some cash on a lens. You are spot on about the circular polarizer, it does wonders for photographing paintings. I used to have one and a roomate broke it along with my lens hence the dust. I am inspired, again, to photograph my work right! So thank you sir!
Cheers!
What great and concise information! For quick images of smaller paintings, I’ve been using an inexpensive scanner lately, which seems to give me (usually) glare free images of my paintings because I don’t have a proper setup to photograph.
I was interested in what you said about using a digital back for medium format cameras. I have an old Mamiya medium fomat that I was gifted which I’m sure has better lenses then the Canon G11 I use for almost everything now. I wonder what I would get to use this?
Forget the digital backs. A quick look shows I can’t afford it!
This is really useful information. Thanks so much for posting. Joe
For days I was undecided between Canon and The Nikon D3200. Fortunately on the day I was going to make my decision your article appeared and confirmed my choice of Nikon . I bought it the day before yesterday. Now I have to learn how to use it as any type of hi-tech is french for me.
Really great article, Marc, thanks so much! I kind of found my own way in figuring out how best to photograph my paintings. Luckily for me, I followed a path similar to yours. I have a Nikon D5200 (love it). I use a wireless remote shutter (about $8.00 on Amazon), I bought Lightroom 4 as well, and bought a book by Scott Kelby with way more info than I needed, but still really useful. I have 2 light stands set up pretty much as you have diagrammed, each with an 85watt CFL (about 300 watts equiv) at 5500K temp. I don’t have softbox covers, but I may look into these based on your success. I shoot with a grey card first and have had pretty good results so far, with quality art prints from my web page with Fine Art America. I had to learn not to “adjust” too much, with Lightroom, when looking at my computer image, because my initial results, when printed were often too warm when compared to the originals. Again, based on your success, I’m going to take a look at an adjustable polarizing filter and the X-rite color checker package, and I’ll also try tethering the camera directly to my laptop when shooting.
By the way, really beautiful artwork, love the light, and thanks again for this great article.
Hi Jack, the D5200 should work in mirror-up mode while tethered too. As far as I know it’s the only one besides the D800 which does.
Hi Marc,
Good post.
I agree with most of what you say.
I photograph art for a living and I wish I could get paid those prices. I charge $100 Euros / hour. The Large Format scanning camera that I use is 216 mega pixels. A scan costs $125…and it is 618 megabytes…My small camera is a 36 mega pixel D800 and images made with that one range between $25 and $50 depending on volume. I recently upgraded it from a D700. Incidentally, I photographed a 4 foot square – thinly painted canvas which gave so much moire with the D700, that I chose the non E version of the D800.
There are several processes that I use to elevate the quality.
Zig Align / Equalight / In camera profiling:
Zig Align is around $150. It uses mirrors to ensure perfect camera alignment. This allows for wider apertures and sharper images.
With Equalight one photographs a white card larger than the painting. The $50 software maps out brightness levels caused by uneven lighting and lens fall off. Then it applies that math to the image file.
‘In camera’ profiling plus the SG chart is 5 times the cost of the Xrite Passport. However, it makes better profiles without the need for a dng workflow. The passport is definitely better than not using a colour managed work flow, but it cannot compare to Pictocolors In Camera profile.
Here I can still work with Raw image processors.
Thanks Grant, that’s great information. I wish I had gone for the D800, it was a bit out of my budget though.
I’ve seen people removing the moire in post. I’ve had moire from the linen grain even with a low-pass-filter camera.
It’s too bad the Pictocolor software doesn’t support 64-bit software. I’ll look into the others and add them to the post when I update again.
Thanks again for your input.
Marc,
I keep Photoshop 5 around just for this reason. I can set it to open in 32-bit to use Pictocolor’s In Camera, so I leave it in 32-bit all of the time. It is easier just to keep both PS5 & PS6 running side by side. Pictocolor’s Edit Lab works well in in both 32 & 64-bit, so I use Edit Lab in both PS5 & PS6.
If you like how much better colour looks using Passport Colorchecker, you will be in total awe using “In Camera”.
Although Capture One Pro has some of the best tools and it can arguably produce some of the largest sharpest files, it is not so hot on its colour interpretation with Nikon Cameras. This is because Nikon will not release the necessary code to Phase One, effectively hamstringing Capture One from being able to do a better job of it. The result is that contrast is ramped up and colour skewed. After building a profile and editing it slightly in Edit Lab [ +5 contrast / + 5 saturation ] colour prints on my iPF8300 almost flawlessly. When an artist sits beside me and I choose the new profile, they say “Now that’s it, That’s what it should look like”
And then there is the Betterlight Super 6KHS scanning Back.
On another note:
If a profesional is truly great at his or her craft, then their efficiency should equate to economics. If you need to use a pro, then choose one who specializes in art photography. A great portrait or wedding photographer is not perhaps your best choice. Skills for each are very different. Portrait photographers will not normally have the skill set nor the experience to give you a perfect job at a reasonable cost.
They may be gaining experience at your expense.
Grant
Thank you a lot Marc, you have put in one post everything I was looking for, and for a while! All the photographs I have “interviewed” had different solutions…
Usually, they don’t agree with the use of a polarizer on the camera, and I would admit it change a lot the colors, and in a non homogen way, no? It takes a lot of light too.. Perhaps mine is too cheap…
I don’t understand why you use first a diffuser for your light and after a polarizer on your box? Why not something where you choose the angle of the light directly? And on the website, I don’t understand which on I should look for.
Excuse me for my bad english (it’s hard for me to understand everything too in the article; good english training!) and my poor level on photography…
I’v bought before Christmas a Nikon D 5300 (I really like the multi angle screen, it’s the only reason why I haven’t take the D7100, a better choice even if more heavy, because you can take pictures under rain, near the sea… I think I will have dust in my camera in two months…) and as it is wifi, you can use your phone as a wireless remote shutter. Its what I thought! I have a nokia Lumia and it works only with android or iPhone.. So, I have a 8€ shutter; it’s really useful, to take picture with a bad tripod. And to take pictures and video of yourself for the blogs ect… (here the reflexive screen will be really useful too…). My camera has a gps, it’s perhaps useful for somebody who is traveling a lot like you, to classify pictures, but it use a lot of battery. I haven’t even look how it works…
I’ve bought a calibration card just a month ago, but without the application; now I would like to eat my hat! I really regret to haven’t buy something like the one your speaking about. And I will perhaps buy something for my screen; I use an old apple screen, and two macbook; I never know what are the good colors! And I work as graphic designer; what a shame… Thank you for the advice. It’s just a little bit hard to spend money for that… I wanted to buy a big time capsule instead.
I have a 1T disk for time machine, but with our big pictures, It’s already too small! I have three other disk, where I put manually my originals; one for picture, one for video (better to loose picture from work than videos from family, I can tell you after having had my house and studio burned…) and one for the rest; design work, marketing and house stuff. If you have troubles with you photo applications you will have troubles to find your pictures. The name can change, the link.. And everything is put in different folders for originals or retuched; it’s good to have a disk with everything in folder with the date (year-month-day-name), so you can find again your original in case of problem with the application, or a virus and to save stuff you don’t have room to put on your computer or from older computers. Time machine is helping for your new works.
I think I will pay for having my two photos and videos disk saved online too. If they are stolen (it has happen to my cousin, who is working home and who is architect; a realll problem!) but before having money for that I will take two other cheap disks to save pictures, videos and important stuff every two or three months and I’ll give it to a friend or to my husband to put it at work .
For the moment I try Aperture, to have a library on a few disk if I want. Because I can’t put all the pictures in my computer. As I work with client oversea, in my island (Saint-Pierre & Miquelon) I have a LOT of heavy pictures that I need to check easily and rapidly.
You can have multi library with lightroom? Or a library shared on a few disk? (it’s what I’m looking for…) I would like to find THE solution for saving and classifying my pictures.. what do you do for yours? It’s perhaps the subject for a new post…
Thank you a lot for this article, very useful. It was my goal for this winter; doing a good studio for me (and friends) to make picture good enough for giclée printing and for the stamps I do for St Pierre (I’m working again in oil; I’ve abandoned the computer!).
I’m use to take my pictures outside but it’s really not easy with the reflections and there’s a lake of homogeny between different shots. As I hadn’t money for the moment and as I wanted to try before buying better lights, I’v listen to what a photographer told me and bought another quartz on a tripod. I had already one; I used it when I was building my house. So, it’s a quite white light, strong and veeeery cheap. With the calibration card and photoshop, you can adjust. And you can use of a big board of polystyrene as a cheap an light reflector too. Don’t forget to put curtain on your windows two… A not so pro solution than your’s of course!
For the lens, I’v choose a Nikon 50mm 1,4. I could have choose a 30 to be closest to the eye vision, but I did a mistake, remembering my old leica 50… argentique! Anyway, I’m really happy to have it and as it is a little bit zoomed, there’s less distortion, it’s more “flat”… And it’s very good to take portrait of family or for an order (another really usefull thing on those new reflex; the video! For the command of portrait, you can take pictures and video on the run and with the same lens and with a really good quality)
Sorry to make so long post!
Happy new year to you and all the reader! Happy painting!
Raphaële
Oh, wow Mark, awesome write up. Taking notes for sure. I use a Canon t2i without a filter but would like to get a setup going where I just take a photo and the color is spot on. Something to look forward to doing this year.
I also have a Nikon camera and shoot in RAW (NEF files), and find that with Nikon´s editing software (Capture NX2) the color is more accurate than with Photoshop. I´ve tried some calibration software with a color chart and DNG files in Photoshop, and the results were not as good as with Capture NX2 and a simple white balance adjustment on a grey card.
(Note: I have a software- calibrated monitor)
Hi Jose, I agree Nikon’s software appears to give the best results with their NEF files, even compared to the camera-profiled results in Lightroom. I find everything else about Lightroom so useful though (the cataloging and export presets) that it suits my workflow better.
Good post, Marc —
I have worked with a pro photographer many times with a dual light set up, but when the painting has thicker brush strokes, that kind of lighting (while eliminating glare) also cancels out all fine shadow detail that delineates thick brush strokes, sometimes creating weird effects I don’t want… That’s when I have to take it outside on an over cast day or find some shade that lets in enough ambient light to show those strokes w/o too much glare. The dual light set up is optimum for flat oils or watercolours, but tricky with more textural surfaces… Have you figured out a way to bypass the glare, but still retain the texture you want? Thanks.
Hi Mark, great great post on photographing paintings. The best and succinct painters version on the topic I believe. I know it would be a lot of hassle but this would be great in a video to exactly see how it all works. That would be awesome.
A friend had an insane 10,000$ art scanner that he let me use. I was very excited and threw my 9×12 to 11×14 oil paintings in there to try it out. I found it glared up the paintings hardcore and made it essentially useless. I can see it working for gouache, but thats about it. Can anyone comment on this?
Excellent article Marc. I’ve been reading about this topic for a while, and you’ve summarized it nicely! I’m late to the party, but wanted to chime in anyway. I’m a painter as well. I wanted to respond to Eric’s question above, about how to maintain texture in paintings when you are using “cross polarization”, meaning a polarizer film over the lights, and a polarizing filter on the lens. I have had this same issue, that the texture is lost in cross-polarized photographs of my paintings. I don’t have a lot of practical experience with this, but here are the suggestions I’ve found from looking around the web:
Option 1. Try using two different powered lamps. Try to maintain even lighting across the canvas, but one bulb has a higher wattage. You may need to back up the lights to achieve even lighting. The difference in wattage may help reveal texture.
2. Add a third light source, without polarization, raked at a tight angle close to parallel with the canvas, probably not too bright, but enough to give some shadow.
3. Turn the polarizing filter on the lens partway, so the image isn’t fully cross-polarized.
4. Skip polarization altogether- either go outside as Eric described, or create a large diffused light surface, potentially above you, parallel to the ceiling. In other words you would use a diffuse fabric like polyester lining, or a white vinyl shower curtain, or a large roll of tracing paper or vellum, attached to a frame, and hung from ceiling. Then shine lights down into that diffusion filter- creating even light across the diffuser panel. It’s sort of like making a big cloud indoors. Careful to keep the lights away from the cloth! Then place the painting at one end under this screen, and your camera at the other, and hopefully this will give a diffuse light with minimal glare.
5. One more option that doesn’t involve polarization: create some “V-flats”, basically a large folded white surface, and shine lights on either side of the painting into the v-flats, creating very diffuse lighting. Do an online search for V-flats, there are lots of tutorials on how to make them.
A professional photographer may be able to expand on this, but that’s what I’ve found so far. I currently shoot my work outdoors mostly in full shade. I find if I shoot on a cloudy day, I tend to get some glare. The problem with this setup is the weather changes, and sometimes the wind will blow over my easel or a painting.
Thanks,
Matthew Lee
http://matthewleestudio.com
Thank you for the nice information. I’m sharing a link to this in my Google Plus community Online Fine Art Exhibition. Hope that is okay with you.
Do you have a book you’d recommend purchasing for information on photographing paintings? I want to photograph art work for uploading to printing sites and Fine Art America and for website exposure. I’m trying to learn how to photograph my daughter’s paintings. We are using a Canon EOS 60D. We want to do our own photography, as it’s too expensive to have someone else do the digital images. Sadly, the University of Montana did not teach their graduates how to do this within their four year Bachelors of Art Degree Program. Your article is great, but I’d also like a book to refer to. We’d also like to purchase an inexpensive lighting set. Thanks!
I’m sorry Lorraine, I haven’t come across any books. Here is a very good PDF you could print out. The beginning is on getting a good photograph of your work.
Thank you for this informative post.
I’ve replicated this process as closely as I can afford and find that while I’ve eliminated glare, I can not seem to get my lights light enough without sacrificing the darks. My skies, for example, are duller than in life and than other photographs of paintings.
Possibly I am still not setting the exposure correctly and should shoot at a slower shutter speed with a release. https://flic.kr/p/YyPBa7
Any suggestions would be appreciated. Thanks again.
It looks like you only have one light source and a raking light too.
I’m by no means a professional photographer, but the camera’s sensors can only do so much with a large value range. You could also try a light HDR by shooting one shot too exposed and another under-exposed and combining them with HDR software (Photoshop does it, as well as a bunch of others).
Marc, thank you very much for sharing this information.
It is very helpful.
What would be the largest size of the painting for the 40mm micro lens?
Why do you have to use 105 mm for your sketches, why not shoot with the same 40mm micro?
Hi Mike, I can photograph very large paintings with the 40mm, I’ve done up to 180 cm (70 in.). I often use the 105 mm as it has to be much further away, so I can tether it to my computer which is on the other side of the room. I haven’t noticed a difference in quality between the two otherwise.
Hi Marc,
I’m glad you are still monitoring this post 🙂
I’ve been shooting some very textured paintings with very high gloss all with cross polarization. I’ve had success (IMO) with lights flat at 90 degrees (i.e. parallel to camera). I found this introduces a bit of shadow to allow for depth/3D like.
I’ve also had to shoot a few paintings with lights at roughly 25 degrees. I’m getting a bit of shadows which I want for texture. Other than that is there a reason I should not be shooting at this angle? All websites I’ve found mention 45 degrees. I admit though it’s been a bit tricky getting enough light on the canvas and getting even lighting.
Any thoughts is appreciated. Thanks 🙂
Hi Cecile, if you like the shadows from the texture, and you get better results at 25 degrees, that sounds fine. The 45 degree recommendation is, in part, to minimize those shadows.
Thank you so much for your tips. I’ve been photographing my art for a few years now, but sometimes have problems with the edges getting blurry no matter how well I set up. Would you recommend the 40mm or 80 mm lens for a large panoramic? I’m shooting a canvas that is 24 x 48 and the edges are blurring with my 16-35 mm Canon lens. I’m shooting with an EOS 5D. Shutter speed 1250, 640 ISO Apperature 5, 27 mm focal length. I prefer a lower ISO, but its been raining and nasty hot, so I had to wait until later in the afternoon in shade. I always shoot outside.
If you use a tripod you should be able to get a much lower ISO. With the 40mm you’ll need much less space to shoot, I believe fixed focal length lenses will often give you better image quality for the same price.
good writeup.
my top tip would be: befor taking the first image, replace the artwork with a mirror and adjust the camera position and angle until the reflection of the center if the lens is in the center of the image.
this ensures camera is centered and exactly perpindicular to the artwork.
then replace the mirror with the painting and start to shoot.
Hi Marc,
Do you have any experience with shooting paintings (with glare) with the iPhone 11? I’m needing to upgrade my current DLSR and iPhone and am curious how it would compare to a new Canon EOS 90D? Aftermarket polarizing filters are available for the iPhone and I have polarizing gels on my lights. Thanks!
Cheers, Philip
My wife prefers her iPhone 11 and shoots through a polarizer. She puts the phone on a tripod and holds a high-quality camera polarizer in front of the lens, then turns it until she loses the glare (using polarized lights, obviously).
I don’t know if the little ones for the phone lenses are adjustable.
Hi Marc, I thoroughly enjoyed reading your post here and found it because I have been trying to get large sharp images of my paintings. Unfortunately after I zoom in on the image in Photoscape X anything after 50% starts to become blurry. I have tried Automatic settings on the camera, manual settings. Took pictures outside in day light and inside using soft lamp lighting. I have a Nikon D5600 and I have tried using different lenses. I purchased a AF-S Micro 40mm DX Nikkor f/2.8g and prefer that one but I am still having issues not being able to get it crisp close up when I zoom in at 100%. When I take it into Photoshop and click on the actual photo naturally it is sharp but it wont exceed say 12″ x 16″ and I want to be able to print posters, large posters. .
The RAW NEF files are 29.8mb 6000×4000 px and the jpegs half that as far as mb’s. I have tried the ISO at 100,200 etc etc, different f-stops.. I just don’t know what I am doing wrong. Is it because the Nikon D5600 shoots at 24.2 MP ? Also what is the best format to convert the NEF files for print? I hope you can help give some insight because I though about maybe scanning my paintings but they are huge and that’d be extremely pricey.
Thank you!
Have you tried shooting with a different camera in the same situation? Just to see if it’s an issue with your sensor? I have a D7000 which is older than yours and am able to get crisp images. It might be an issue with your camera.
Hi Marc, I have a Canon EOS. I have had it for a while. Is it possible to get lenses for this camera to photograph my art? I am on a tight budget but need to get good photos. If so, what do you recommend? Thank you, Kathy
Hi Kathy, unfortunately I know nothing about Canon lenses or cameras. From a quick Google search it looks like the EOS takes a Canon EF mount lens. You could buy used from a reputable dealer like KEH to save money.
Please research carefully what you buy as I really know nothing about Canon. For shooting smaller paintings you can use a longer lens (80mm and up) for large paintings you need a shorter lens (50 – 80mm). If you want to shoot large paintings with a long lens, you would need a very big room. I hope that helps.
Thank you very much, Marc, for this very helpful post. I am a complete ignoramus on all things photographic, but have to do something, as my long-time photographer retired. Question: Do you think this set up, w/ the 40mm lens, etc., could shoot paintings as large as 60″ wide?
Hi Tom, I’ve photographed paintings close to that size with my 40mm. You just have to get back further.
Thank you for sharing your setup and advice! I am coming back to this after almost 7 years as it’s time to upgrade our D300 camera body. I’m wondering is this still your setup and does your advice remain the same? I see in the comments you had wanted the D800 and settled for the D7000, but that was some time ago. I’m looking at the D780 and D850, but I also see there are now some newer mirrorless options coming out. If you were to buy a full frame camera today purely for documenting art and taking reference photos, what would you get? Any advice would be greatly appreciated. Otherwise, thanks again for this article!
Hi Brett, I did end up getting a D800 (used) for a very good price. I’m very happy with it. As you point out though, things have changed with Nikon also entering the mirrorless market. I’ve personally used Panasonic m4/3 cameras since the GH1 for video, and I really love them for their size and ease of use, so I have some experience with mirrorless cameras. If I was looking now, I would seriously look at the new Nikon Z7. It has one of the best sensors out there and, with the adapter, one’s investment in F-mount lenses will still be of use. Since the new Z7ii is about to be released as well, there also might be a price drop in the near future.
Another advantage to the mirrorless camera is that we can avoid shooting with the mirror-up mode, without risking any shaking. Plus you’d get a beast of a video camera if you want to branch out.
All that said, I’m not an expert on cameras in general, so you should probably check with someone who has first-hand knowledge on the subject. I do, however, think if you get any modern DLSR with a full frame sensor that takes high-resolution photographs you’ll be very happy with the results. Just remember to get the disk space to store all the photographs.
This is a great help. Thank you so much, Marc!
Thank you so much. This was extremely helpful.
Marc
Thanks for the time creating the video and responding to all the comments..I have at least 100 bookmarks for photographing paintings. Your video is by far is the most helpful.. I have a few questions about lighting for my oil paintings.
1.) I noticed you have the rectangular polarizing film attached ( taped ?) to the front of your rectangular soft boxes.. cleaver….Does the rectangular shape affect the light distribution across painting?
2.) what is the largest painting you can photograph with your setup? My painting are up to 42″ x 48″ to date..
3.) Did you have to modify you light boxes to mount the lamps you replaced?
4.) I’ve been looking at a pair of Godox SL 60w lamps to use in light boxes. Do you think they are a good choice? I tried to track down the ones you use from the image in the video but couldn’t tell for sure. Are the Godox SL equivalent to what you use?
5. It you don’t mind which rectangular soft boxes do you use..?
Thanks again for your time and effort.. I’ve been trying to track down how to photograph my paintings for years. Any help would be greatly appreciated….
If you’re curious, Goodle Ron Waalkes art . It will take you to links for my WIX webpage (not up to date).
Thanks again
Hello , many thanks for your informations
I have a canon .5D mark iv
Which lens should i use for photography large panting
My problem is the shooting room is not so big
Many thanks for your advise
Best ramin