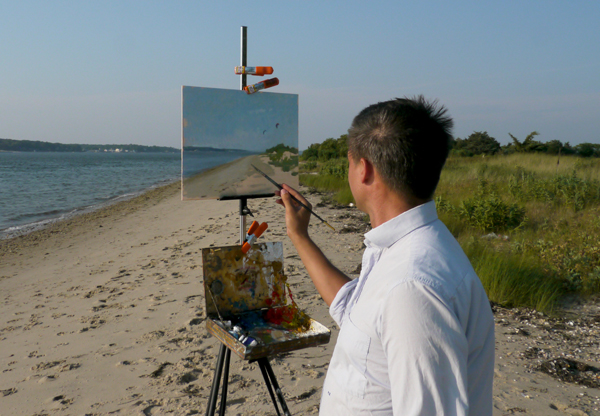
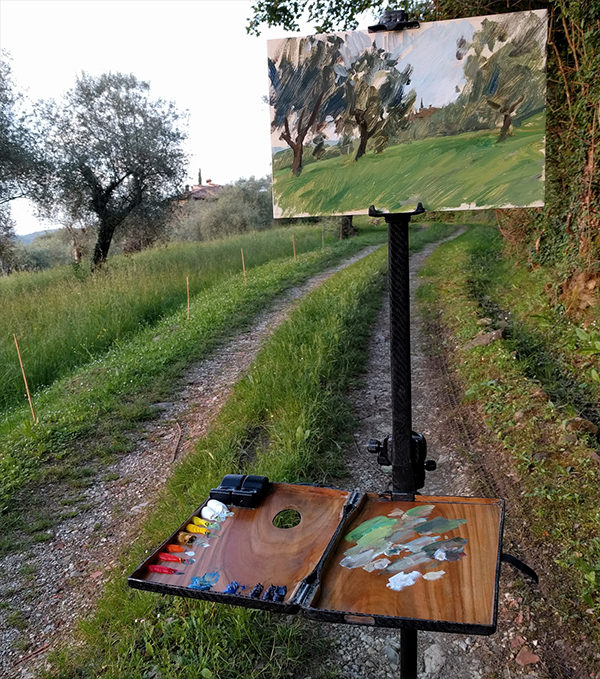
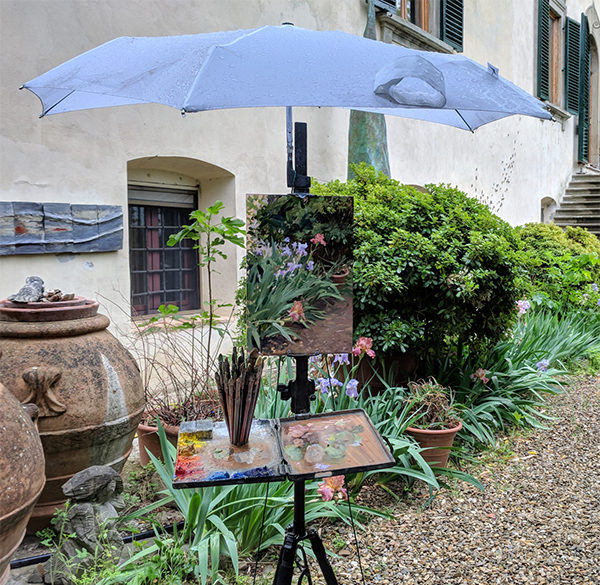
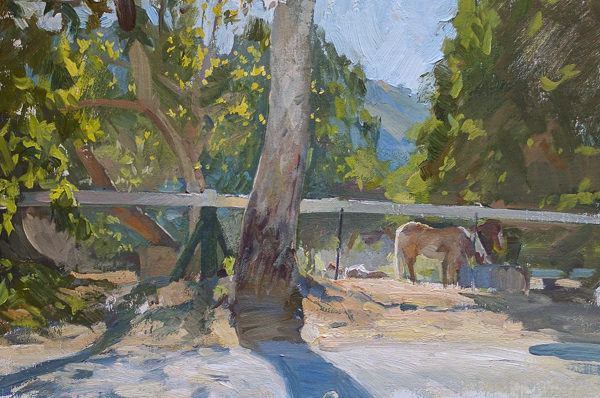
The first time I saw a plein air painting incorporated into the surrounding landscape in that way was many years ago when someone took a photo of a painting I was working on outside (above). This person lined up some of the major lines in the painting with the lines in nature behind the panel and thought it was very clever. At the time I was mildly annoyed with the image as I thought it would confuse people into thinking that it somehow related to sight-size.
As it turned out, I was right.
A few years later when we all started carrying decent quality cameras around in our telephones, I started regularly posting my paintings to social media directly from the field. Usually I took a photo of my painting with the actual scene on one side, so students who follow me could see my decisions by comparing the two. On a few occasions though, something would happen where my view would be obscured when I was finished and I would take the photo with the painting covering the scene. I would also align some of the lines so that the painting and the background appeared to merge.
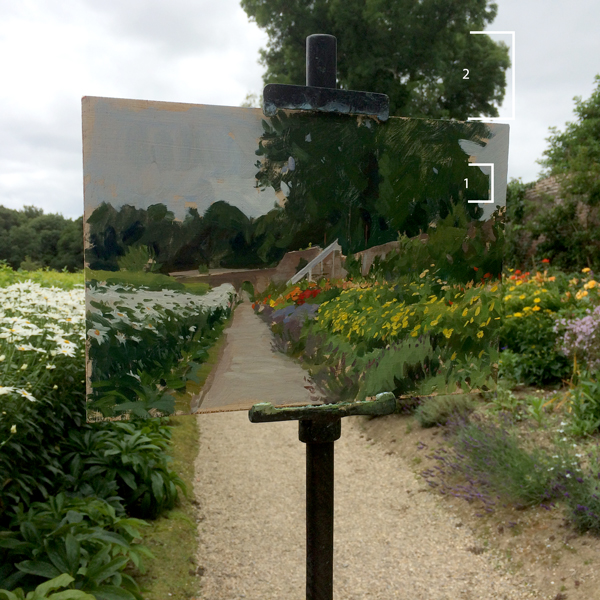
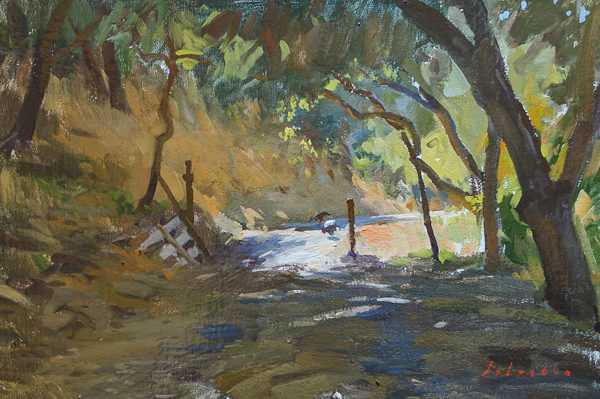
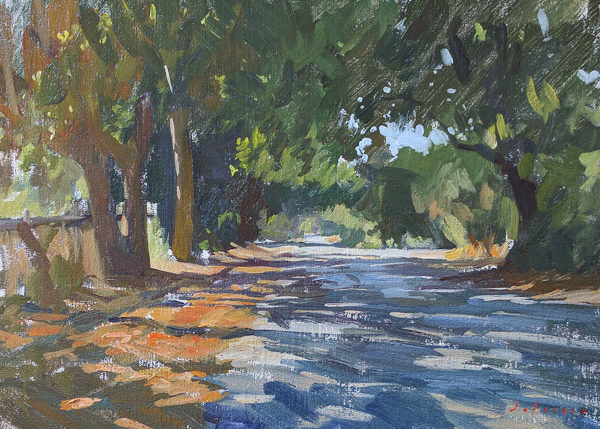
One example of this is the painting below, where a tour group arrived and parked themselves in the path just behind my panel. As it was lunchtime, and I didn’t want to wait for them to leave, I used the painting to block them from the view.
This has nothing to do with sight-size though. In the photo above, you can see how the painted bulge of the tree (1) is completely different in size from the actual shape in nature (2). This is because, in order to get the lines to line up, I’ve had to pull the camera back away from the painting. When I did the painting my viewpoint would have been closer, and the two shapes would have been the same size. (See my sight-size video on YouTube for further clarification).
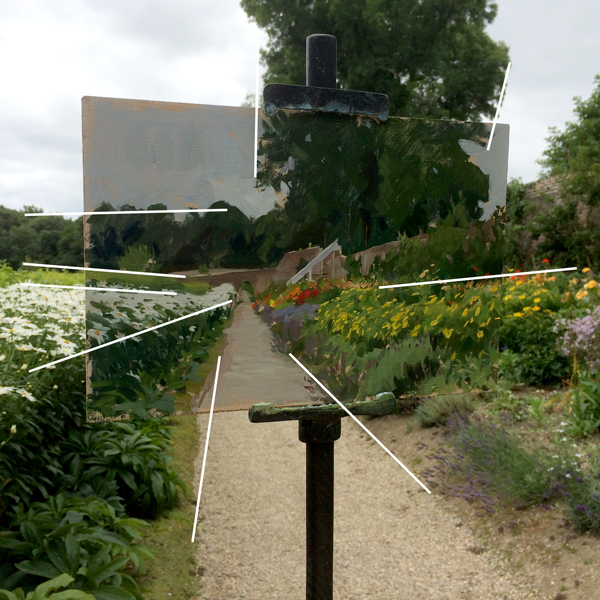
All I’ve really done is moved the camera until some of the major lines in my painting align with the same lines in the actual scene. I even had to tilt the camera away from the panel a bit to get it to work.
This has been a bit long-winded, but I just wanted to say that these aligned photos have nothing to do with sight-size. Any artist working outside can do them, with any technique or medium. Having compressed, naturalistic values will help with the illusion, but I’ve seen some wonderful examples of very stylized work doing the same trick. Just move the camera until a few important shapes line up with the view behind.
We spent our September this year plein air painting in Portugal. It was the first time I had visited the country and we started from the north near Apulia, and worked our way south to the Algarve. We had great weather, with the exception of some fog on the coast. The food was terrific (and inexpensive) and the people were all really friendly.
Outside of the cities, Portugal and California look very similar. From the ubiquitous eucalyptus trees, to the cliffs looking down on an ocean teaming with surfers, to the rolling hills with golden grass and cork trees (which look like California live oaks), to the traditional whitewashed architecture which is similar to the Spanish colonial buildings, there were many times when I did a double-take to remember where I was. The light, like in California, is especially beautiful.
Villas in Sintra. 25 x 35 cm, oil on panel.
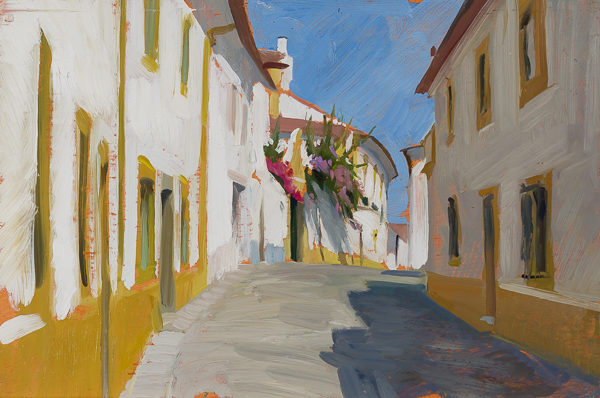
Bougainvillea, Évora. 20 x 30 cm, oil on panel.
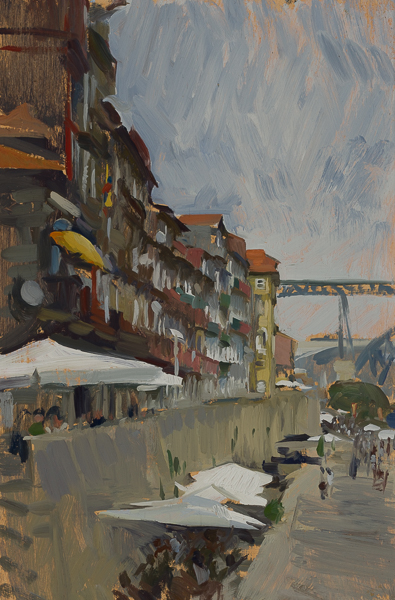
Porto, the Waterfront. 30 x 20 cm, oil on panel.
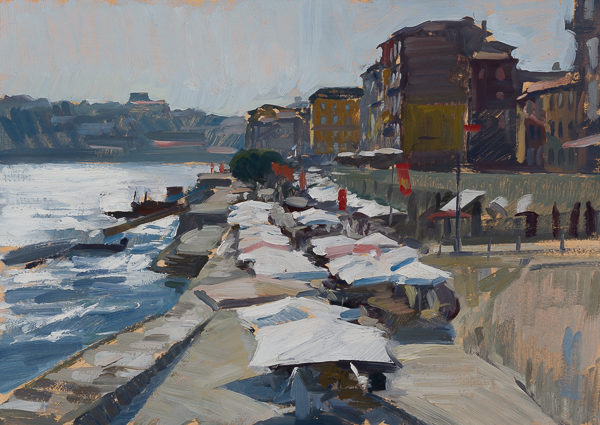
Market Stalls, Porto. 25 x 35 cm, oil on panel.
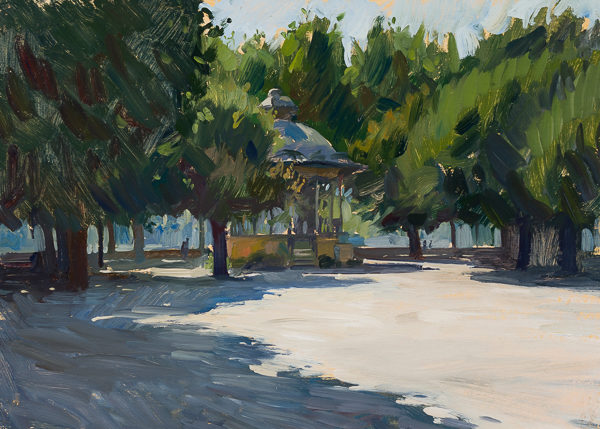
Pavilion in a Park, Coimbra. 25 x 35 cm, oil on panel.
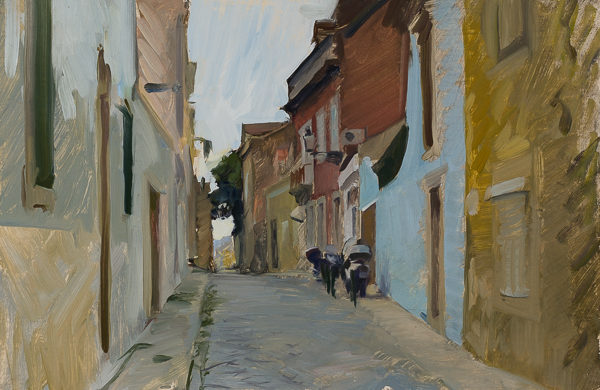
Street in Aveiro. 20 x 30 cm, oil on panel.
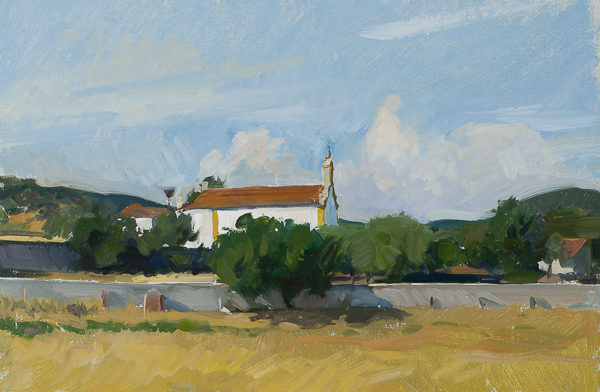
Igreja de São Brissos, Alentejo, 20 x 30 cm, oil on panel.
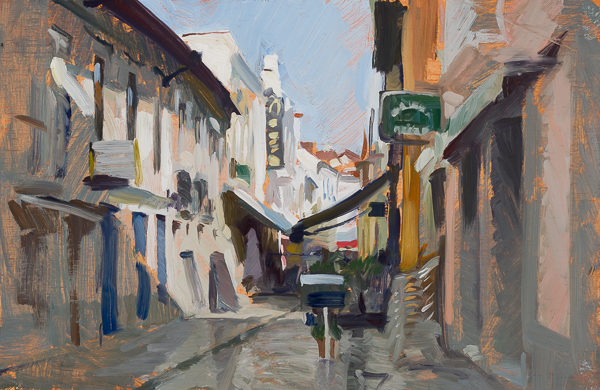
Street in Lisbon. 20 x 30 cm, oil on panel.
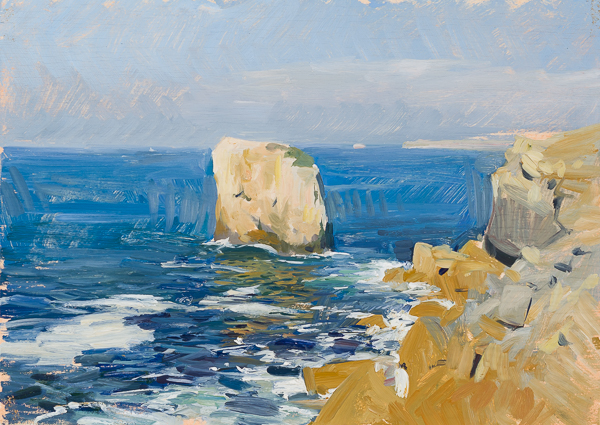
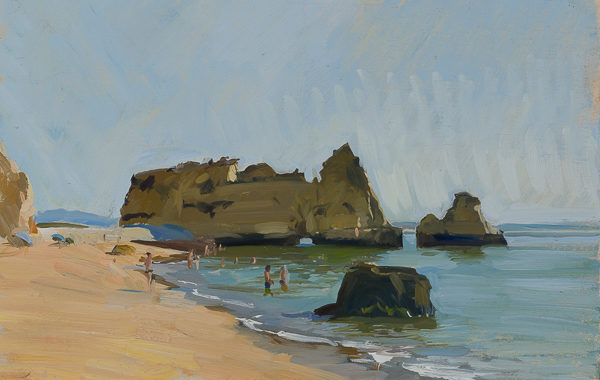
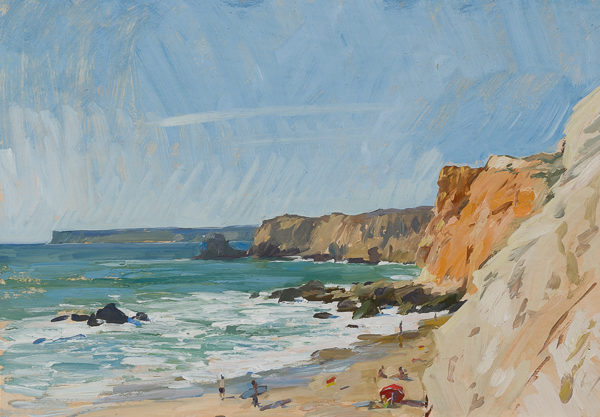
The light in the Algarve is stunning. Since the coast faces south, the sun is above the water most of the day. The area is more built-up than other coastal areas that we visited, but there were a lot of wonderful views.
Praia de Dona Ana #1. 25 x 35 cm, oil on panel.
Praia de Dona Ana #2. 20 x 30 cm, oil on panel.
Praia do Tonel, Sagres. 25 x 35 cm, oil on panel.
Evening Light, Algarve. 20 x 30 cm, oil on panel.
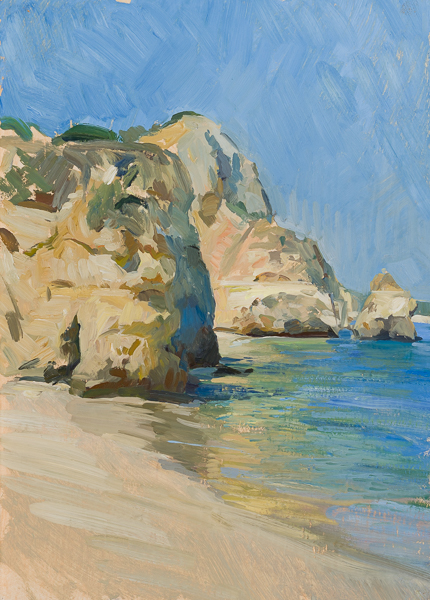
Praia do Camilo. 35 x 25 cm, oil on panel.
As pretty as Lisbon and Porto are, we didn’t spend a lot of time in the bigger cities as we were traveling with a dog and the smaller towns and countryside were more manageable.
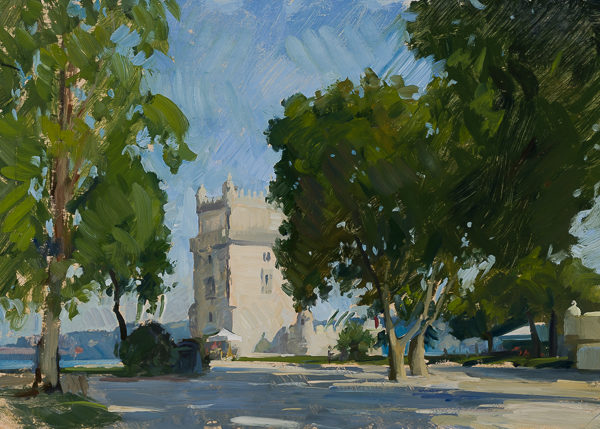
Sycamores at the Belém Tower, Lisbon. 25 x 35 cm, oil on panel.
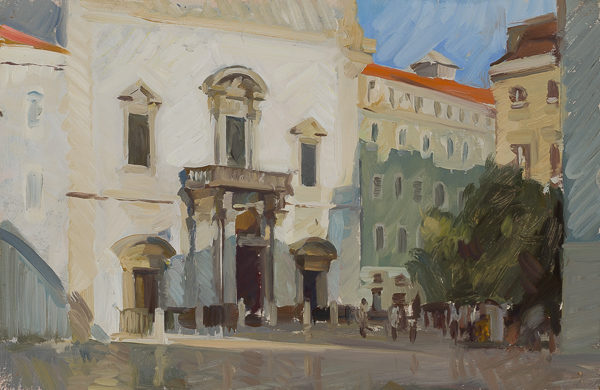
Igreja de São Domingos, Evening Light (Lisbon). 20 x 30 cm, oil on panel.
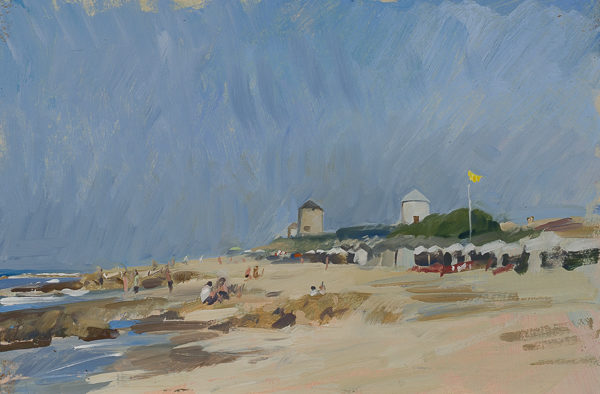
Windmills on the Beach, Apulia. 20 x 30 cm, oil on panel.
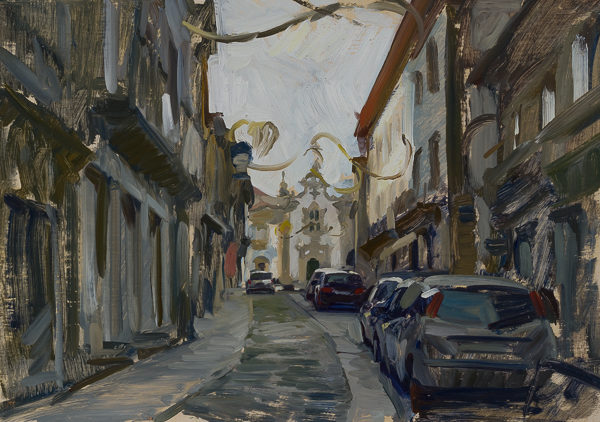
Street in Viana do Castelo. 25 x 35 cm, oil on panel.
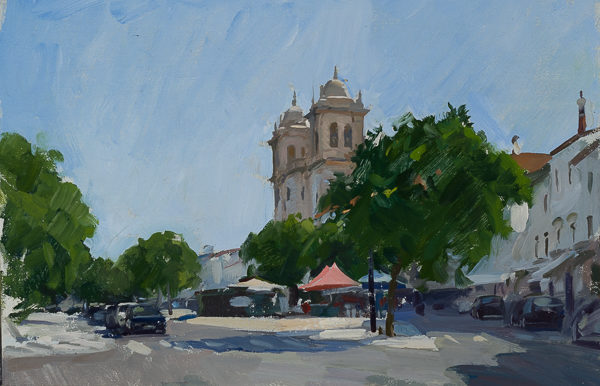
Rossio Marques de Pombal, Estremoz. 20 x 30 cm, oil on panel.
This is another update in my continuing quest to build a lightweight and durable pochade box and mast system in carbon fiber.
I would first like to preface this post with the statement that I am not an expert in working with carbon fiber and, the truth is, I have no idea what I’m doing. When I was a teenager, I tried to make a skimboard out of fiberglass. While my project wasn’t all that successful, I did learn how to work with the resin and fabric composite system which is common to both fiberglass and carbon fiber. My recent foray was guided by that single experience 30 years prior, combined with online research and a few YouTube videos. This should in no way be taken as an expert guide on building painting equipment with carbon fiber, and there are almost certainly much better ways of doing this.
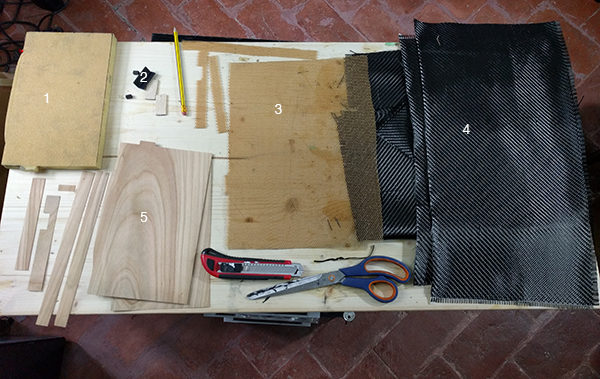
That said, I do now have a few working pochade boxes and a large format plein air easel, so I wanted to show how I did it. And with that in mind, here are all the parts I used for my box:
Materials for a DIY carbon fiber pochade box
Foam mold I cut for the box shape.
Purchased pre-made carbon fiber reinforcements and wood slats for extra strength at the mast-hook and hinges.
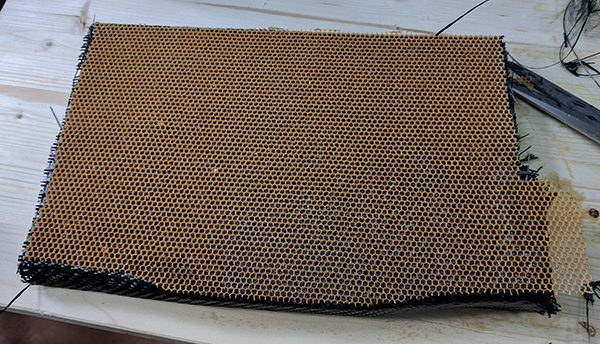
Nomex honeycomb for rigidity.
Carbon fiber twill.
Wood veneer.
Epoxy resin (not shown).
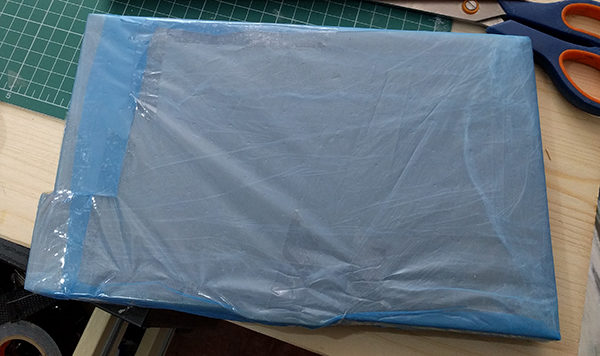
And the method I used: First I covered my cut foam mold with released film.
Step 1: Foam mold covered with release film
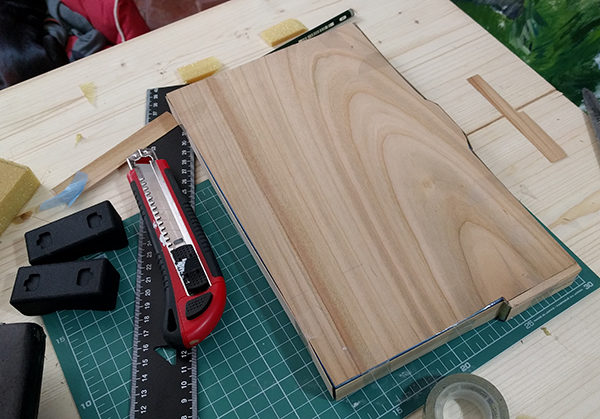
Then I taped the wood veneer in place.
Step 2: Wood veneer taped around mold.
Next I brushed on epoxy and wrapped it with a couple of layers of carbon fiber. I added extra layers of carbon fiber, as well as the pre-made carbon fiber bits and wood slats in sensitive areas, such as where it hooks to the mast and where the hinges would go, respectively. (I didn’t photograph this stage).
Then I wrapped the Nomex honeycomb cardboard around that.
Step 4: Nomex honeycomb wrapped around the first two layers of carbon fiber.
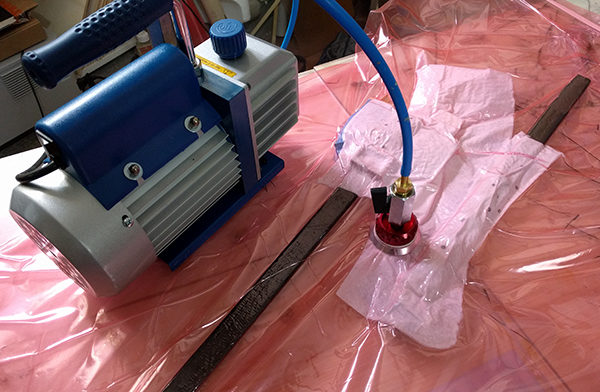
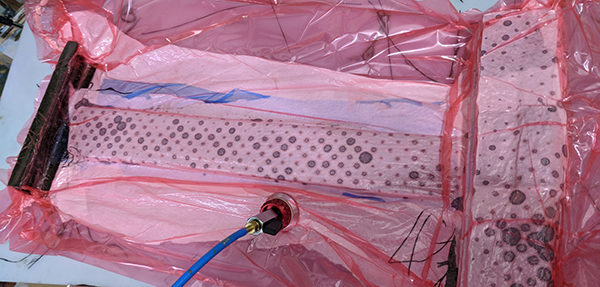
Next I added final layers of carbon fiber (and epoxy), wrapped it with perforated release film and breather cloth, and and stuck it all in a vacuum bag.
Step 6: The box goes in a vacuum bag for 24 hours.
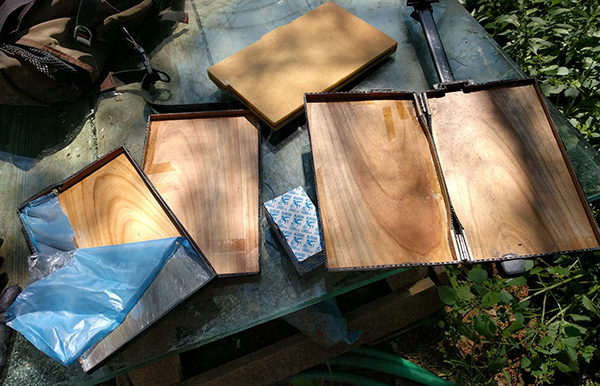
After the epoxy cured, I cut it the box in half with a Dremel, screwed in the hinges, and added another layer of carbon fiber to cover the hinges (not shown). Finally I cut the box in half again, cut holes for the mast-hook and my thumb, and sanded down everything.
Step 8: The box has just been cut in half with a Dremel, and the mold pulled out.
Cutting and sanding composites such as fiberglass and carbon fiber creates a great deal of dust which is very dangerous to inhale. While working on these projects I wore a bunny suit, respirator, gloves, and protective goggles.
For the mast, I wrapped carbon fiber around a balsa wood slat with an attached Arca Swiss camera plate and put it in a vacuum bag. I folded the extra carbon fiber from one end up over a small foam rectangle (wrapped in release film) to make the hook for the box.
DIY painting mast in a vacuum bag
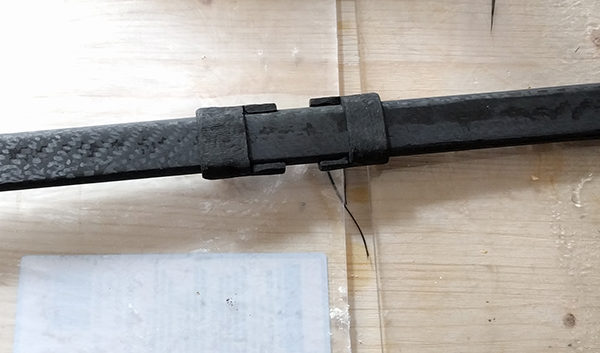
For the panel holders I first wrapped tin foil around the mast to give some space, then wrapped that with release film, then wrapped carbon fiber again (with a bolt in the middle for the butterfly screw) and stuck it in a vacuum bag.
Panel holders tubes on my DIY carbon fiber mast.
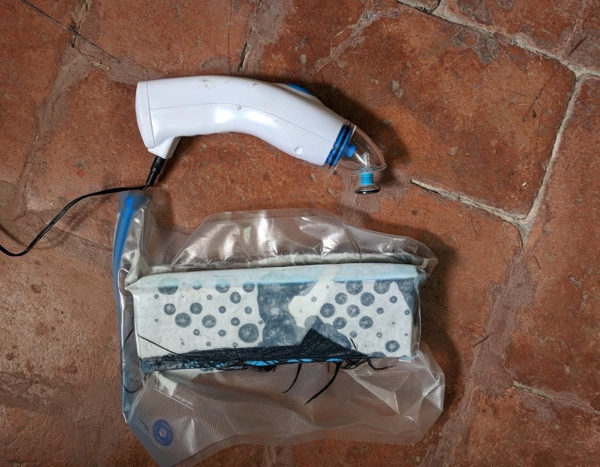
Finally, I covered the panel holder tubes with carbon fiber layers and epoxy, and attached it to a mold with the shape I wanted for either panels or canvas or both, and put that into a food-storage vacuum bag. I switched to the food-storage vacuum bags so I could make a few at the same time. It works as well as my regular vacuum pump.
Making smaller carbon fiber mast clips with a food-storage vacuum bag
For the attachment on my Senz umbrella, I similarly wrapped both the cut-down umbrella shaft and the mast in carbon fiber, stuck them both into a vacuum bag, and then sanded everything down.
Custom carbon fiber mast attachment for my Senz umbrella.
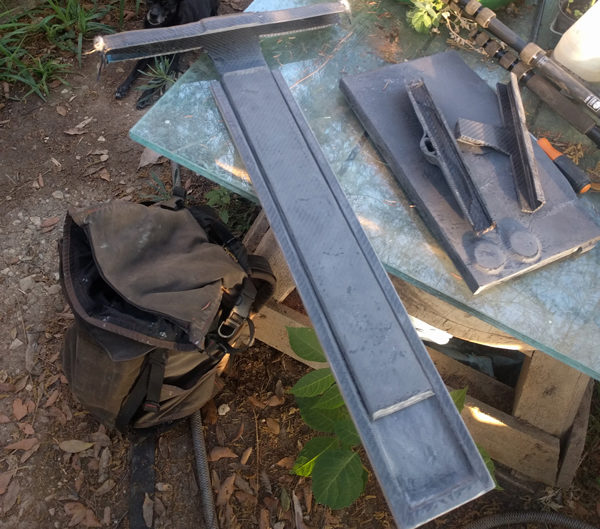
As I mentioned last time, I’m not convinced this set-up is all that superior to a cigar box attached to an aluminum tripod easel, but I have a working system now so I’ll stick with it. Here are a couple of shots of my set-up in the field:
Small carbon fiber pochade set-up in the field.
Carbon fiber plein air painting system with a Senz umbrella.
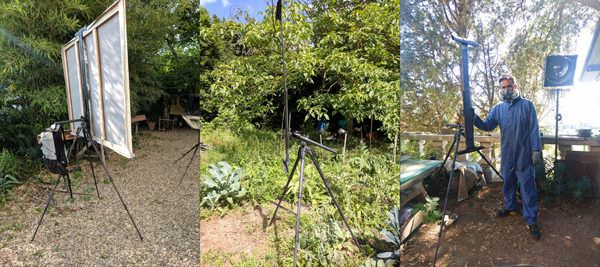
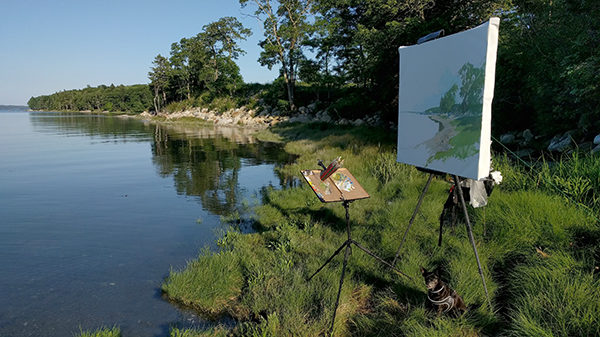
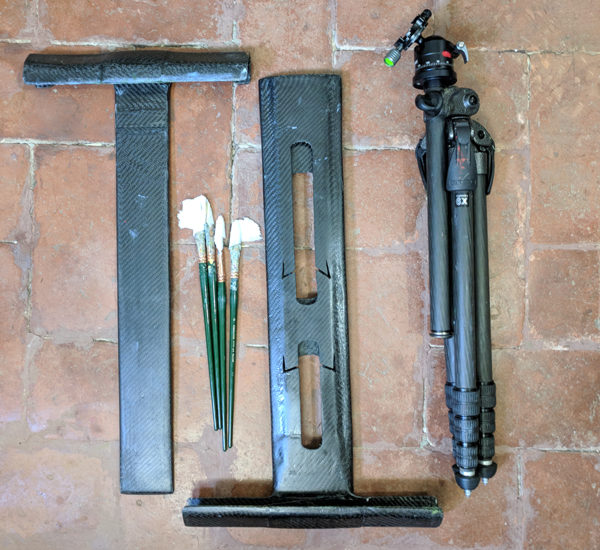
The one area I have had great success with carbon fiber equipment is for larger, relatively lightweight easels. The one I currently use is shown in the photos below. It packs down small enough to fit into my suitcase, but expands to take up to a 47″ (120 cm) vertical stretcher bar. It attaches to a large Gitzo tripod via a heavy-duty ballhead. I also built a larger folding palette that I can both use in the studio, and then carry into the field and hook it to my smaller mast on the Sirui tripod. This way I’m always using the same paints, whether I’m working inside or out.
Larger carbon fiber easel design.
My kit on site in Maine.
To make the larger easel, I cut the shape of the masts in balsa wood, and wrapped them with carbon fiber and Nomex honeycomb. The top and bottom wedges to hold the canvas were wrapped around a mold to get the shape. I did it in three steps to get the parts to fit together.
Larger carbon fiber easel in a vacuum bag.
After the second stage of building a large carbon fiber easel.
The finished easel. Brushes for scale.
My carbon fiber half of the easel weighs in at around 2.5 lbs (1.2 kg), and I attach it to a very sturdy Gitzo GT2541EX which is 4.1 lbs (1.8kg). I got a tripod with the column that can be set at any angle with the hopes I could avoid buying a ball head, but it hasn’t really worked out. To get enough height in some situations I need the column up pretty high and have to use a ball head to keep the easel perpendicular to the ground.
My next customization will be to attach webbing and a buckle system to both the easel and my backpack, so I can quickly attach and detach it, as well as carry my large canvases on my backpack. The two camera tripods fit into the pockets on my backpack.
Overall, it’s been a lot of work to get this system going. A few people have asked me to go into production with these but, for the moment, it’s too much work for me to produce even one working model. Maybe if I can find a partner to make them, I’ll look into it. In the meantime if anyone wants to use any of my ideas for their own projects, go for it. As I said earlier, you’re not missing out not using a carbon fiber easel, but they are very lightweight and (I think) they look pretty cool.
This is an update to a post from a few years ago. I’ve been interested in developing a lightweight set-up for plein air painting and I feel I’ve finally achieved my goal. At the moment my backpack with gear for a day of plein air painting has a base-weight of around 8lbs, or under 4kg. For painting in rain, at night, or if I’m expecting variable weather I can add equipment as needed.
You can see the set-up in the images below:
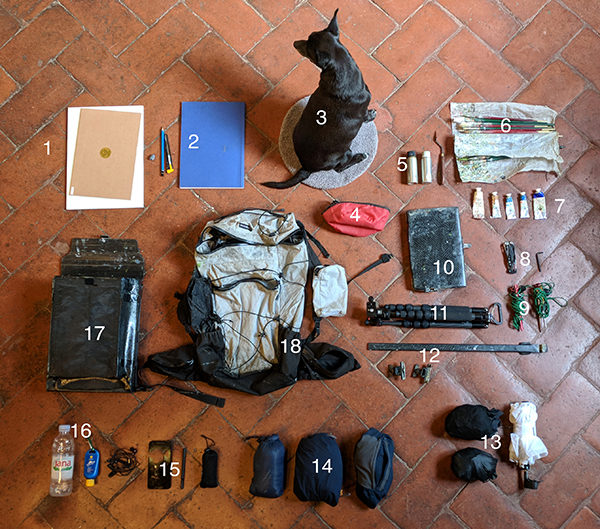
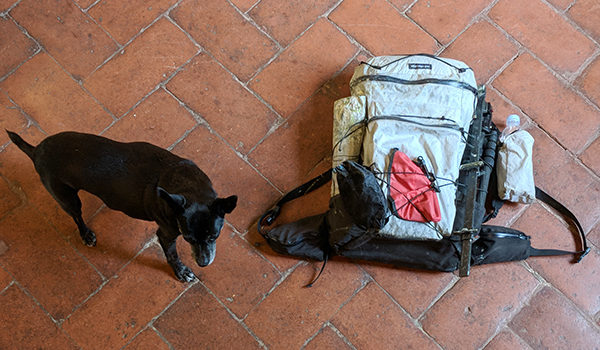
My ultralight plein air painting kit.
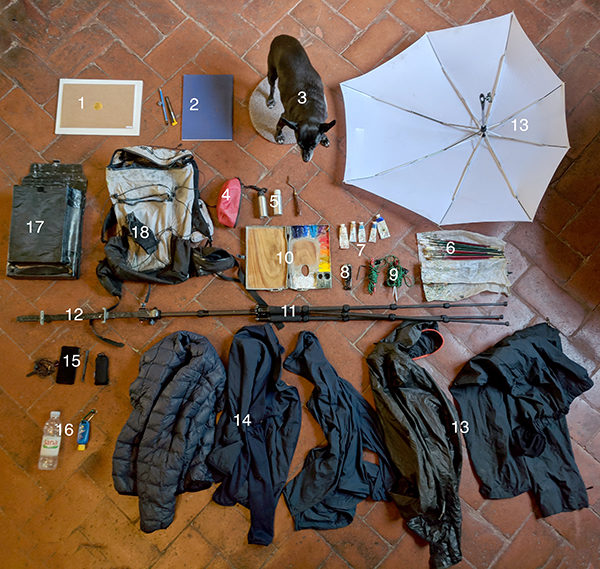
My kit with everything opened.
Everything in the backpack. Small dog for scale.
Here is the key for the numbers, with hyperlinks (some are referral):
Most of my gear is normal painting equipment but I’ll go over some of the things.
1. New Traditions Gatorfoam panels with Claessens linen work very well. The glue never comes undone, even if the panels are left in a car window in August (I’ve tried it).
2. Kunst & Papier sketchbooks have the best paper of any I’ve found, and the paper binding makes them lighter than hardcover sketchbooks.
5. I use a Canada balsam/sun-thickened linseed oil mix for my medium, and lavender essence for my thinner. These aluminum bottles aren’t great as they start to leak after a year or so. I’m still on the lookout for a better system.
6. My set-up would be much lighter if I could learn to use fewer brushes. There are some very good painters out there who use one or two brushes for an entire oil painting. I don’t know how they do it.
7. Cadmium paints last a week on my palette, so I only bring tubes of the three blues I use (cobalt, ultramarine, cerulean), ochre, and titanium white. I go through a lot of those colors.
8. I probably use the Leatherman Skeletool once a year, and most times don’t carry it. Same with the allen key, once I get the proper tightness on the legs of the tripod I don’t really need it.
9. Most of the time the weight of the backpack and a water bottle is enough to keep the easel steady while I paint. In high winds the tent pegs work great. If I can’t get them into the soil I tie them to rocks or even lampposts or signposts in cities.
10. My next blog post will be on making a custom carbon fiber pochade box, mast set-up, and panel carrier (#12 and #17).
11. The Sirui t-025x tripod is the lightest tripod I could find that had decent stability and got up high enough for painting equipment.
13. For a rain jacket I really like the new Gore-Tex Shakedry jackets as they still breath even when you’re drenched in heavy rain. My previous jackets would ‘wet out’, meaning the face fabric would get soaked with water and keep the membrane from breathing, and the jacket would feel stuffy and suffocating in warm rain. This one breathes so well that I’ve even worn it in the summer as a bug jacket. The downside to the Arc’teryx version that I have is that the zipper leaks in really heavy rain. Other brands make them with better zippers. My umbrella is a Senz storm umbrella with a custom attachment that I made for the mast of my easel. It keeps the rain off of the painting and the palette, but unfortunately dumps it onto me while I work.
14. For carried clothes, the fleece/down/windbreaker jacket combo works great. Obviously I only take what I think I’ll need, but for shoulder seasons and places where the temperature can change dramatically (cough * the California coast * cough) the three layers give me a lot of versatility. Also, the dog gets cold quicker than I do, so she usually sleeps wrapped in one of the layers. In the past I carried a down vest rather than a jacket and I think vests are great for painters as allows for more mobility with our painting arms. And on the subject of shoulder mobility, climbing clothes are usually stitched differently so the sleeves can be raised easily. I find they work better than city or street clothes with the sleeves stitched in the ‘arms down’ position where you fight the fabric to raise your arm. It’s not a huge deal, but something to consider. All my shirts, jackets, and hats are black, dark grey, blue or dark blue so as to not reflect a confusing color back onto my painting when working contre-jour.
15. My current phone is a first generation 5″ Google Pixel. I wanted the larger storage (128GB) for shooting video while I travel, a high quality camera, and I prefer a headphone jack to the bluetooth-only design of newer phones. A powerbank is very useful for charging my phone when I forget to charge it at home, and the stylus works as a backup pencil if I need to sketch. In reality I almost never use it.
18. The KS Ultralight backpack works very well, but it’s not 100% waterproof. My worry with backpacks is that my medium will leak out, not that water will get in, so I’ve added an inner liner to the outer pocket where my pochade box goes.
This is still a work in progress, but I have arrived at a point where I don’t feel I can improve on anything in particular for the moment. Everything works great, and weighs as little as possible. My next goal is to get a similar set-up for carrying and working on very large plein air landscapes and I’ve almost got that working as well, so stay tuned.
Wild Turkeys, Carmel Valley. 8 x 12 in., oil on linen.
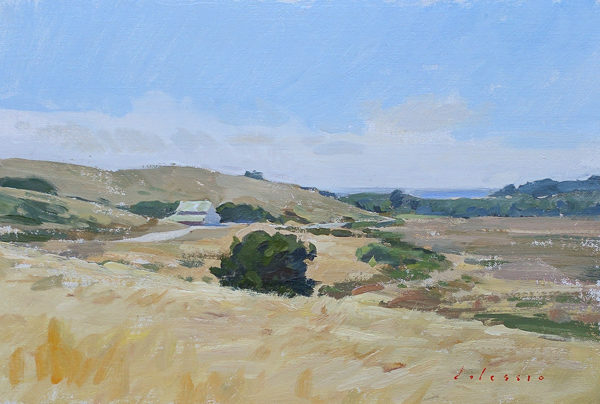
Plein air painting in California is always a joy and I’ve said before that I believe I became a landscape painter because of the beauty of California’s Central Coast. Here are images of my recent paintings of the area. As always, I spent a lot of time scouting by car as I needed to find picturesque motifs to enlarge into larger pieces in the studio this winter.
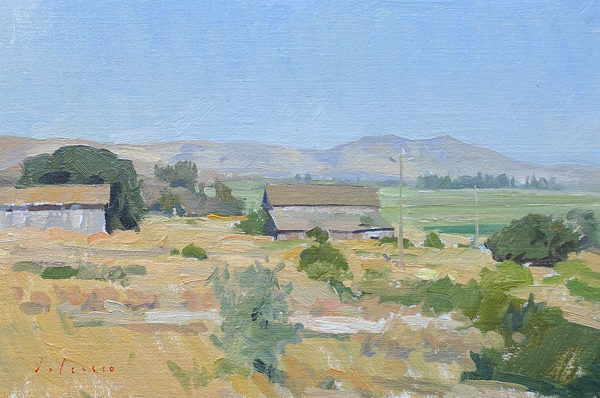
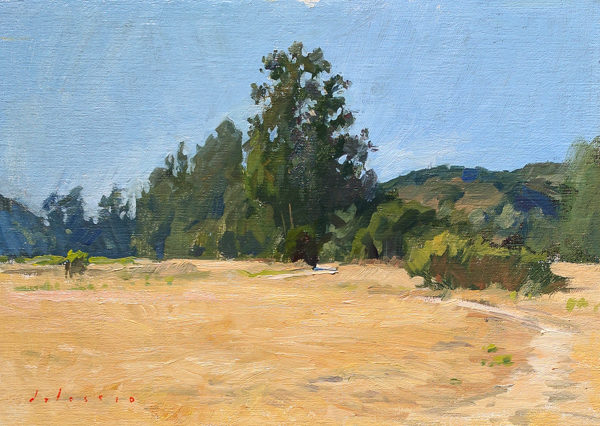
Farm near Soledad. 8 x 12 in., oil on linen.
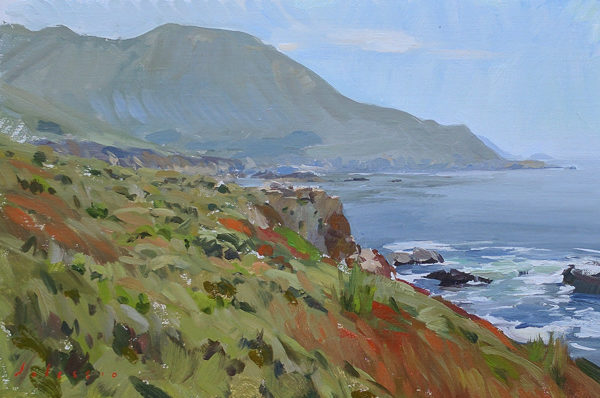
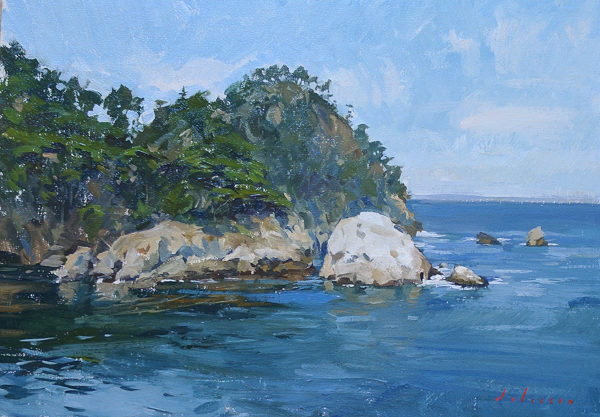
Chaparral at Garapata State Beach. 8 x 12 in., oil on linen.
Point Lobos. 11 x 14 in., oil on linen.
In an attempt to lighten my travel kit, I tried just using a cellphone to photograph my work this trip. It didn’t really work out and I apologize for the quality of the images. I’ll go back to lugging around a DSLR.
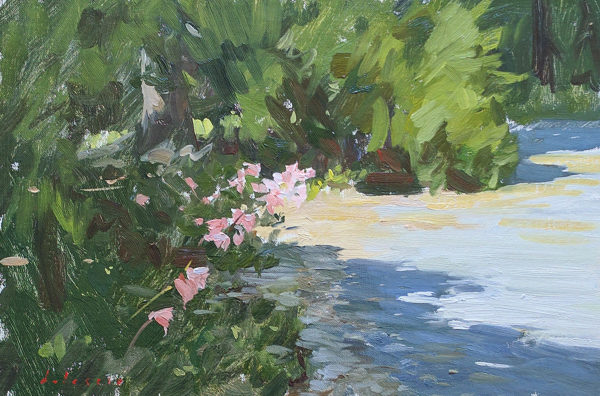
Belladonna Lilies. 8 x 12 in., oil on linen.
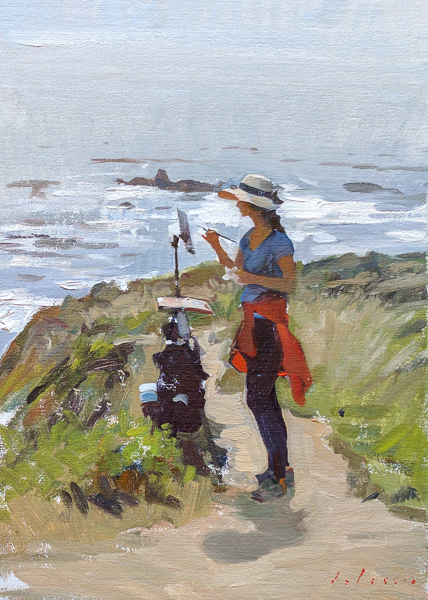
Tina Painting in Big Sur. 44 x 11 in., oil on linen.
I taught a couple of workshops for Carmel Visual Arts and we painted in two of the Monterey Regional Parks District‘s parks. They’ve done a great job of setting aside some of the more beautiful parts of the Monterey area for public use and preservation.
Garland Park #1. 8 x 12 in., oil on linen.
Garland Park #2. 11 x 14 in., oil on linen.
Garland Park #3. 11 x 14 in., oil on linen.
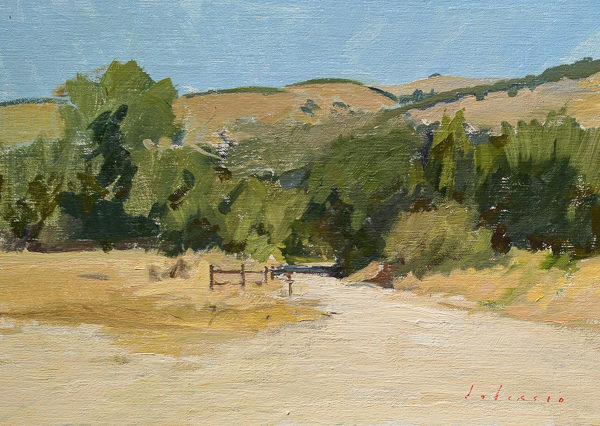
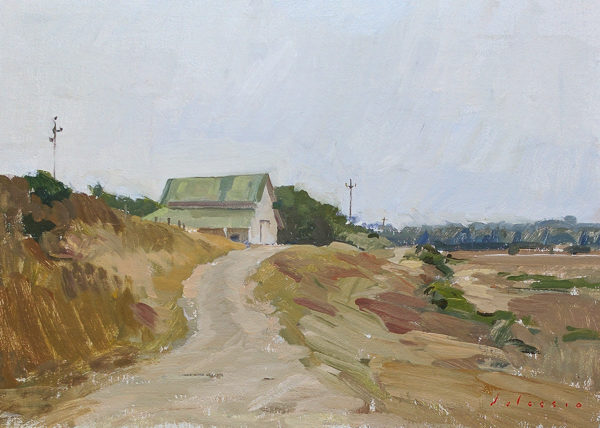
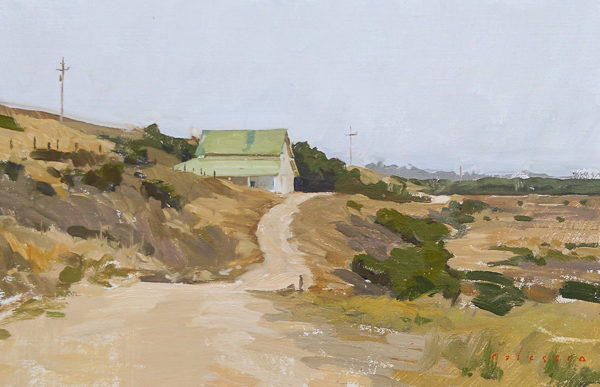
The Barn at Palo Corona #1. 8 x 12 in., oil on linen.
The Barn at Palo Corona #2. 8 x 12 in., oil on linen.
The Barn at Palo Corona #3. 8 x 12 in., oil on linen.
The last three are from around my parent’s house in Carmel Valley. I’m always really interested in the views of neighborhoods as I love art which is focused on local scenes, which people might not notices as they pass by in their daily lives.
Horses on Garzas Road. 8 x 12 in., oil on linen.
The One Lane Bridge. 12 x 8 in., oil on linen.
Garzas. 11 x 14 in., oil on linen.
Before heading to the East Coast we painted around Lake Tahoe and near Sacramento and I’ll try to post those images in a future update. It’s always hard keeping up with the online stuff in the summers as there is so much painting to be done.