This is my third post on photographing artwork using a DSLR, and hopefully the last. This video is the culmination of a decade of research as well as years of purchasing and trying various equipment. The TLDR is that I’m able to get great results as far as color calibrating the camera with a C1 IT 8.7 card from Coloraid.de and Lumariver Profile Designer software. Combined with a used DX camera from Nikon, a used macro lens, softbox lights, polarized sheets over the lights, and a circular polarizer on the lens, it’s possible have a very professional set-up for a reasonable investment. Probably less than the cost of one session with a professional photographer.
For capturing more detail for archival purposes, I’ve found that a full frame, large-sensor Nikon gets very good results.
I hope you enjoy the video.
P.S. I’ve put Amazon affiliate links in this post, but I personally bought my lenses and camera body from small local camera shops. Given the current situation, it’s better if we all try to support small businesses. It also allows you to check the shutter count, see that everything works, and sometimes they even offer their own warranty.
I’ve uploaded a video on my winter gear for plein air painting in snow. I realize it’s a bit late for the season, but now is a good time to buy winter clothes on sale. My apologies for the poor video quality, but it was filmed quickly on my phone after we returned from painting in Vermont last winter.
This is an update from my previous post on painting in extreme cold. The two major improvements I’ve made are switching to yak wool, as it’s warmer than merino, and getting a waterproof down jacket. In the video, I mention my strategy for layering a thin waterproof shell over an insulation layer and I think this strategy is great for a number of reasons, a couple of which I forgot to mention:
You can get better quality gear by purchasing the layers separately.
You can quickly dry the gear out if it gets wet by separating the layers.
You can use the shells in other seasons for painting in rain, and you can use the insulation alone if there is no wind or precipitation.
That said, I think that the jacket is the only place where separating the shell and the insulation is a bad idea as it restricts mobility too much. I was using a Jottnar Fjorm jacket before and when I had to put a shell on it for freezing rain or snow I lost too much dexterity in my arms. I’ve since switched to a waterproof Crux ‘expedition’ jacket and it works much better. I barely feel it when I’m painting, and it’s fantastically warm.
2022 update: Don’t buy Crux. My new one leaks badly in the rain and they don’t reply to emails regarding their warranty.
Here are links to the manufacturers in the video: Overshoes. Cabelas Trans Alaska boots: (I use the Harkila Inuit. They stopped making them, but you can find them on Ebay). Khunu: Yak wool socks and sweater. Kora: Yak wool long underwear. Arc’teryx: Pants and gloves, both insulated layer and shell. Atom is their line of insulation, for the shell I get whatever is lightest. Goosefeet Gear: Down Hibbard mitten. You have to write to him, but he can make anything for you. Mountain Equipment Concordia Fleece (Polartec Thermal Pro is the heavy fleece fabric). Crux: Waterproof down jackets, I have the Magma. Rapha: Deep Winter Collar (balaclava). Millet: Primaloft hat.
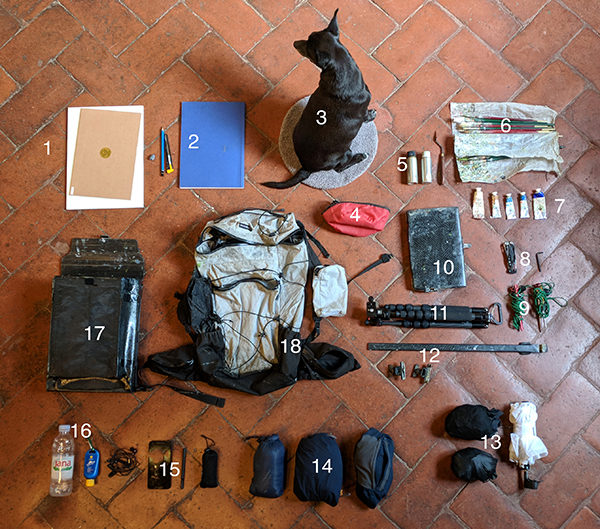
This is an update to a post from a few years ago. I’ve been interested in developing a lightweight set-up for plein air painting and I feel I’ve finally achieved my goal. At the moment my backpack with gear for a day of plein air painting has a base-weight of around 8lbs, or under 4kg. For painting in rain, at night, or if I’m expecting variable weather I can add equipment as needed.
You can see the set-up in the images below:
My ultralight plein air painting kit.
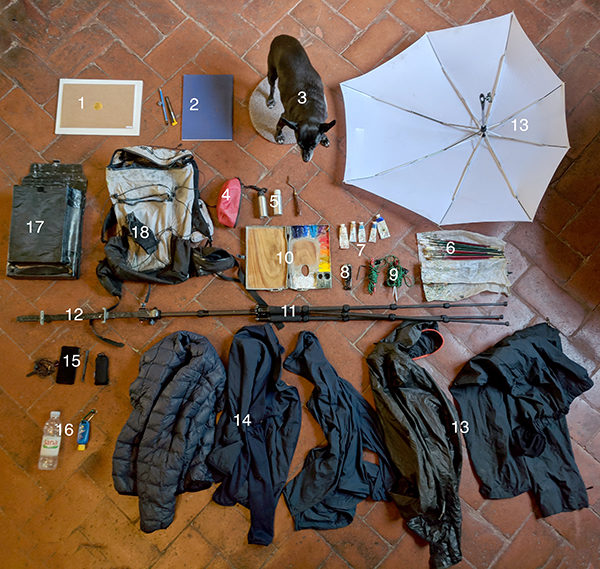
My kit with everything opened.
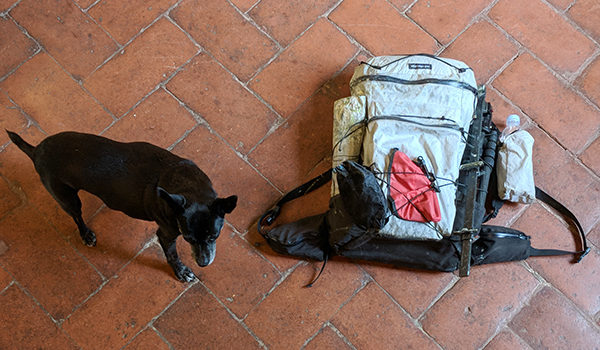
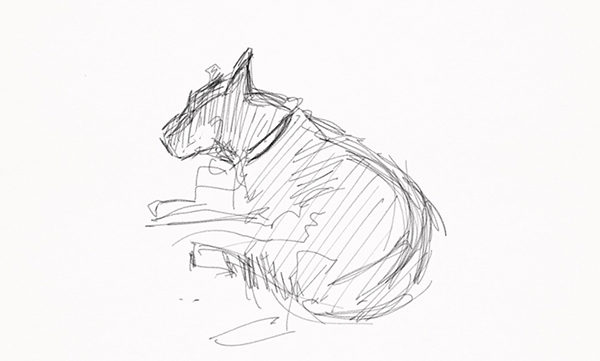
Everything in the backpack. Small dog for scale.
Here is the key for the numbers, with hyperlinks (some are referral):
Most of my gear is normal painting equipment but I’ll go over some of the things.
1. New Traditions Gatorfoam panels with Claessens linen work very well. The glue never comes undone, even if the panels are left in a car window in August (I’ve tried it).
2. Kunst & Papier sketchbooks have the best paper of any I’ve found, and the paper binding makes them lighter than hardcover sketchbooks.
5. I use a Canada balsam/sun-thickened linseed oil mix for my medium, and lavender essence for my thinner. These aluminum bottles aren’t great as they start to leak after a year or so. I’m still on the lookout for a better system.
6. My set-up would be much lighter if I could learn to use fewer brushes. There are some very good painters out there who use one or two brushes for an entire oil painting. I don’t know how they do it.
7. Cadmium paints last a week on my palette, so I only bring tubes of the three blues I use (cobalt, ultramarine, cerulean), ochre, and titanium white. I go through a lot of those colors.
8. I probably use the Leatherman Skeletool once a year, and most times don’t carry it. Same with the allen key, once I get the proper tightness on the legs of the tripod I don’t really need it.
9. Most of the time the weight of the backpack and a water bottle is enough to keep the easel steady while I paint. In high winds the tent pegs work great. If I can’t get them into the soil I tie them to rocks or even lampposts or signposts in cities.
10. My next blog post will be on making a custom carbon fiber pochade box, mast set-up, and panel carrier (#12 and #17).
11. The Sirui t-025x tripod is the lightest tripod I could find that had decent stability and got up high enough for painting equipment.
13. For a rain jacket I really like the new Gore-Tex Shakedry jackets as they still breath even when you’re drenched in heavy rain. My previous jackets would ‘wet out’, meaning the face fabric would get soaked with water and keep the membrane from breathing, and the jacket would feel stuffy and suffocating in warm rain. This one breathes so well that I’ve even worn it in the summer as a bug jacket. The downside to the Arc’teryx version that I have is that the zipper leaks in really heavy rain. Other brands make them with better zippers. My umbrella is a Senz storm umbrella with a custom attachment that I made for the mast of my easel. It keeps the rain off of the painting and the palette, but unfortunately dumps it onto me while I work.
14. For carried clothes, the fleece/down/windbreaker jacket combo works great. Obviously I only take what I think I’ll need, but for shoulder seasons and places where the temperature can change dramatically (cough * the California coast * cough) the three layers give me a lot of versatility. Also, the dog gets cold quicker than I do, so she usually sleeps wrapped in one of the layers. In the past I carried a down vest rather than a jacket and I think vests are great for painters as allows for more mobility with our painting arms. And on the subject of shoulder mobility, climbing clothes are usually stitched differently so the sleeves can be raised easily. I find they work better than city or street clothes with the sleeves stitched in the ‘arms down’ position where you fight the fabric to raise your arm. It’s not a huge deal, but something to consider. All my shirts, jackets, and hats are black, dark grey, blue or dark blue so as to not reflect a confusing color back onto my painting when working contre-jour.
15. My current phone is a first generation 5″ Google Pixel. I wanted the larger storage (128GB) for shooting video while I travel, a high quality camera, and I prefer a headphone jack to the bluetooth-only design of newer phones. A powerbank is very useful for charging my phone when I forget to charge it at home, and the stylus works as a backup pencil if I need to sketch. In reality I almost never use it.
18. The KS Ultralight backpack works very well, but it’s not 100% waterproof. My worry with backpacks is that my medium will leak out, not that water will get in, so I’ve added an inner liner to the outer pocket where my pochade box goes.
This is still a work in progress, but I have arrived at a point where I don’t feel I can improve on anything in particular for the moment. Everything works great, and weighs as little as possible. My next goal is to get a similar set-up for carrying and working on very large plein air landscapes and I’ve almost got that working as well, so stay tuned.
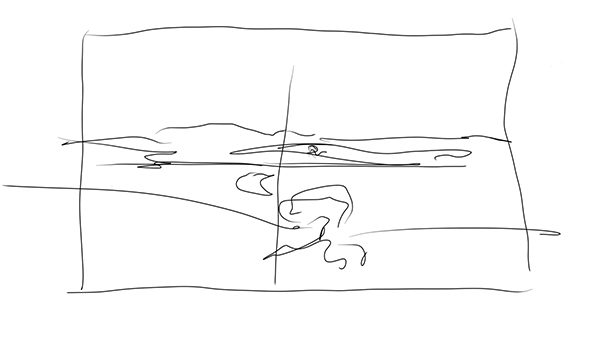
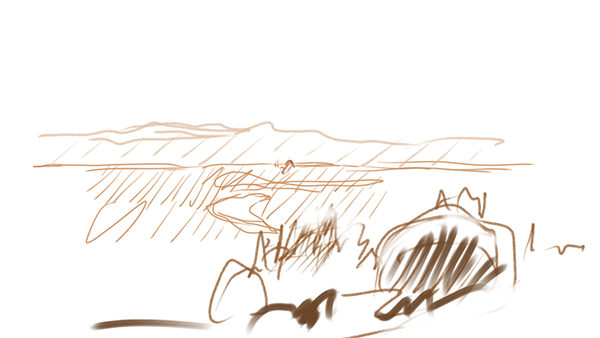
I’ve been aloof with the blog posts. My apologies. I have a few longer posts in the works, and a few videos I’m working on. Here is the first one, the demo I normally do on my plein air painting courses showing how to glaze a dry landscape painting.
I’ll post the next ones as soon as I have enough free time to finish them.
After my recent anti-technology rant, here’s a post on smartphone apps for landscape painters.
These apps wont make anyone’s paintings better but they can facilitate putting oneself in a position where the focus is on the subject. The only surefire way to improve your painting with a smartphone is to use it as a black mirror.
I’ve switched recently to Android, so the links are to the Google store. I’m sure there are equivalents for iOS.
Weather
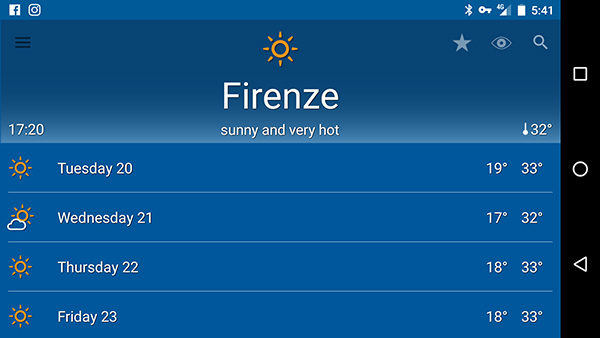
Il Meteo Weather App
Il Meteo’s hour by hour prediction is usually very accurate.
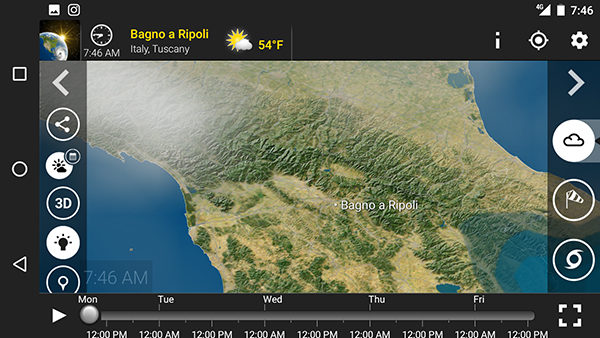
Knowing what the weather will do is obviously incredibly useful. I wrote before about Il Meteo, the Italian meteorological website I use to predict weather for plein air painting. They also have an app. It’s the one I always check first as it’s accurate most of the time. It’s pretty general though, and for more specific information I use MeteoEarth ($10/year) which has cool little animations which show you wind direction, cloud cover, and precipitation for the coming days.
Meteo Earth’s animated cloud cover display.
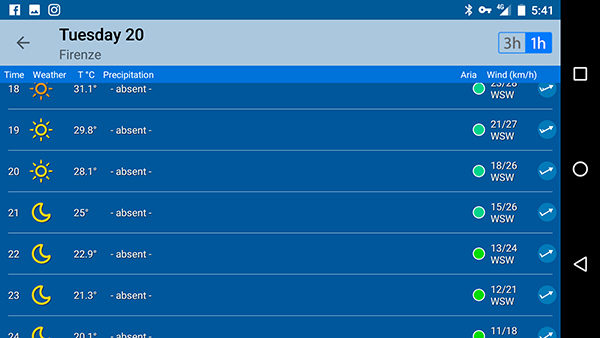
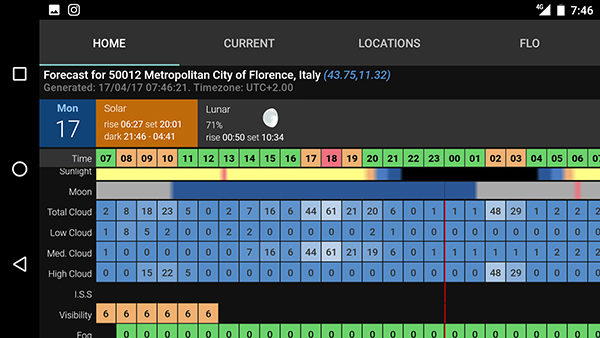
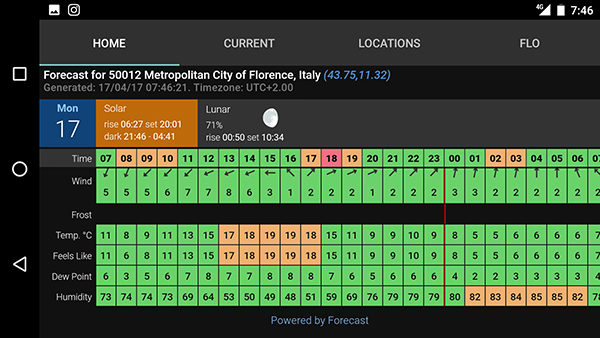
It also shows wind speed and temperature but I prefer Windy for wind prediction, and after 25 years in Europe I still haven’t figured out what the numbers in celsius mean (I know 0 and 40). The third app I use for weather is Clear Outside, which forgoes the fancy maps and animations and just gives numerical values for everything. I find its prediction for cloud cover especially useful as it is normally accurate, and because it splits them into high, medium, and low clouds. It also gives the dew point, which can be useful for predicting how wet I’ll get when trudging to my spot in the early morning.
Windy wind-prediction app.
Clear Outside’s numerical weather forecast.
More Clear Outside, showing the dew point and humidity.
I usually check all three apps and follow the majority opinion.
For people in other parts of the world, RainToday (it only shows up in the UK app stores) seemed to work well for simple, short-term rain prediction in the UK, and NOAA and MyRadar get good reviews from painters in the US.
Sun Prediction
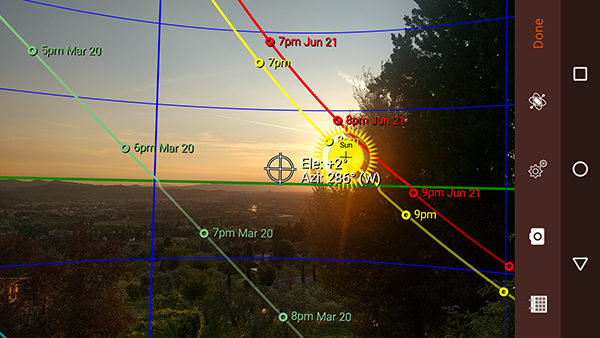
Sun Seeker’s sun-prediction augmented reality view.
There are a bunch of these for landscape photographers. My favorite is Sun Seeker as it does an augmented reality view where it uses your camera to overlay the sun’s path through your view. It also gives the positions at other times of the year, which can be useful if you have a particular subject that you want in a particular light. The other one I check occasionally is Exsate Golden Hour, but really just to check the sunset and sunrise times. It gives the time for the ‘golden hour’, but I think it’s different for painters than photographers as I consider my golden hour to last much longer than the app does. It also predicts stuff like ‘expressive skies’ based on whether it’s going to be partly cloudy at sunset. For calculating sunrise and sunset The Photographer’s Ephemeris can also calculate mountains that will shorten the day at either end, but it’s a confusing app and I don’t use it. I mention it because landscape photographers seem to love it. They have a desktop version you can try for free.
Maps
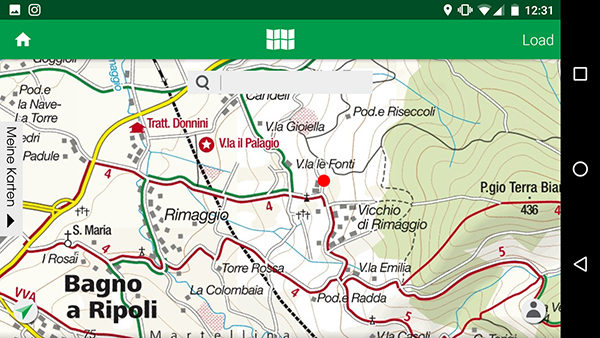
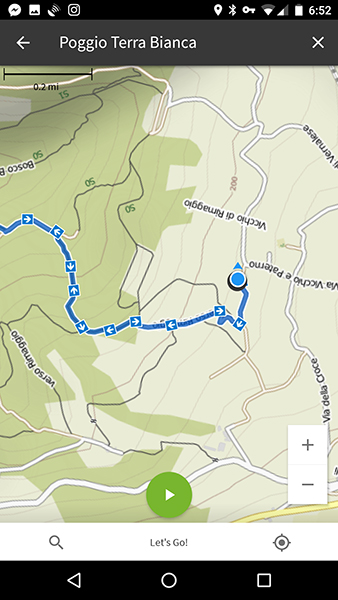
Kompass topographical maps
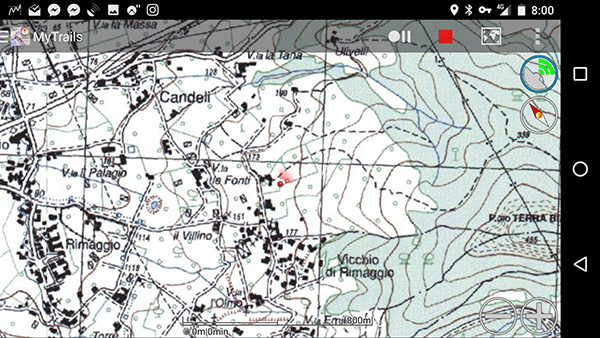
I find topographical maps to be very useful in scouting for landscapes. I can often calculate a good view by studying the lay of the land before I even start driving to the location. And they are especially well-suited to scouting in Italy as I can often predict the picturesqueness of a view based on the layout of the buildings (older buildings are rarely on a grid, and are usually much better for landscape painting). My favorite paper maps of Tuscany are made by an Austrian company called Kompass and some of my favorite painting spots were found using their maps, so I was quite happy to see they now have an app. It’s not as nice as having a paper map, but it’s certainly more convenient. Their library isn’t very extensive, but they do central Tuscany quite well (the only building they don’t have is the one I live in now). When I couldn’t find Kompass maps for an area, I would often use the Italian state’s (IGM) maps which are available via other apps like MyTrails and BackCountry Navigator.
MyTrails using the Istituto Geografico Militare maps.
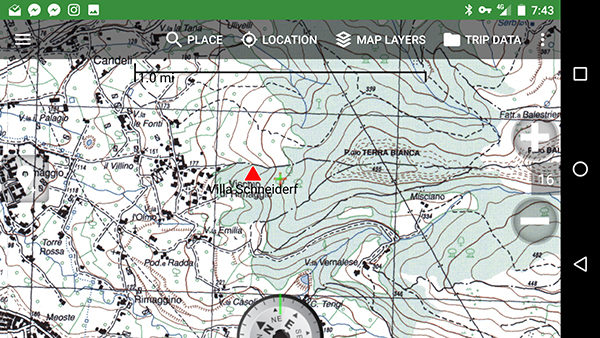
Istituto Geografico Militare map on BackCountry Navigator
The other map app I’ve played around with is Komoot, which has navigation instructions for hiking and mountain biking, and does a good job of knowing actual trails in the areas around Florence where I’ve tried it.
Komoot’s trail navigator.
Gaia GPS gets very high praise from hikers but, as it doesn’t show the buildings here in Italy, I prefer the other apps.
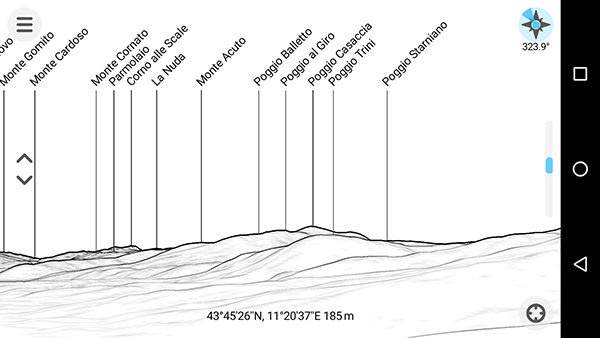
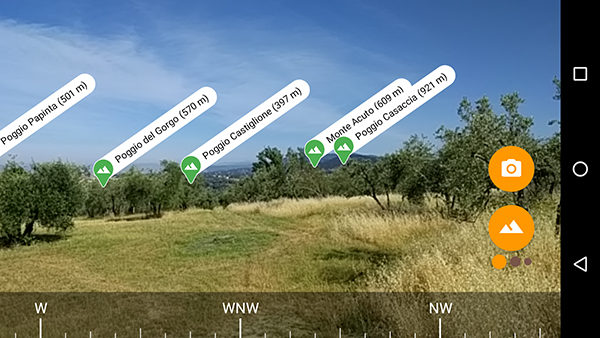
Lastly, Peakfinder and Peaklens can show you the names of mountains in your view, which can be useful for titling work.
Screenshot of Peakfinder pointed over the rather uninteresting Arno valley.
Peaklens’ augmented reality view (more or less the same view as Peakfinder above).
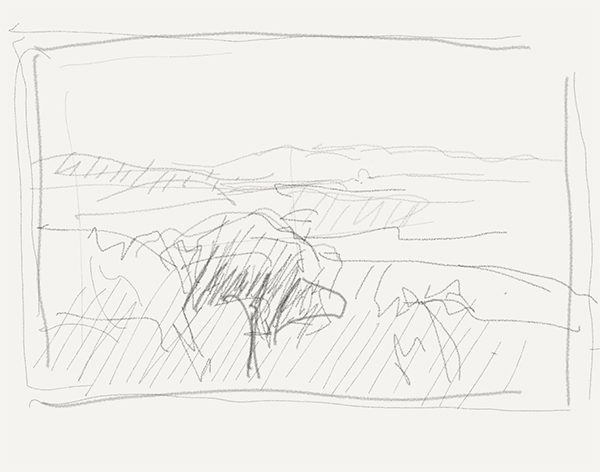
Drawing
I bought a Jot Pro stylus and tried a few drawing programs. I can see how it would be useful for thumbnails and for artists who feel more comfortable with digital media, but I still prefer a pencil and paper. I tried Autodesk’s Sketchbook, PaperOne, and Bamboo Paper. I think PaperOne was my favorite of the three as it felt the most like an actual pencil. Their lay-out leaves much to be desired though as the tools take up too much of the screen space. Autodesk felt the most polished of the three.